Manuals should come alive.
Manuscript — for the web.

설명서는 살아 움직여야 하니까,
웹을 위한 매뉴스크립트.

  • Web tours
  • Web manuals
  • Video creation
  • 웹 시연
  • 웹 매뉴얼
  • 동영상 제작

No more clunky screen recordings and stuttering voice-overs. One click and the narration follows the guide text you wrote while the web page comes alive and plays itself, step by step.

Pick just the parts of the site you want to show, click, and a custom demo video comes together. One record button covers the whole arc — author, save, play. Install now and put together the perfect web demo in a minute.

번거로운 화면 녹화도, 어색한 내레이션도 필요 없어요. 클릭 한 번이면 직접 작성한 설명에 맞춰 음성이 흘러나오고, 화면이 단계별로 살아 움직입니다.

내가 원하는 웹사이트 가이드라인 구성만 쏙쏙 골라 클릭해도 맞춤형 시연 영상이 뚝딱 완성! 녹화 버튼 하나로 가이드 영상 제작부터 저장, 재생까지 한 번에 해결하세요. 지금 바로 다운로드하고, 1분 만에 완벽한 웹 소개 영상을 만들어 보세요!

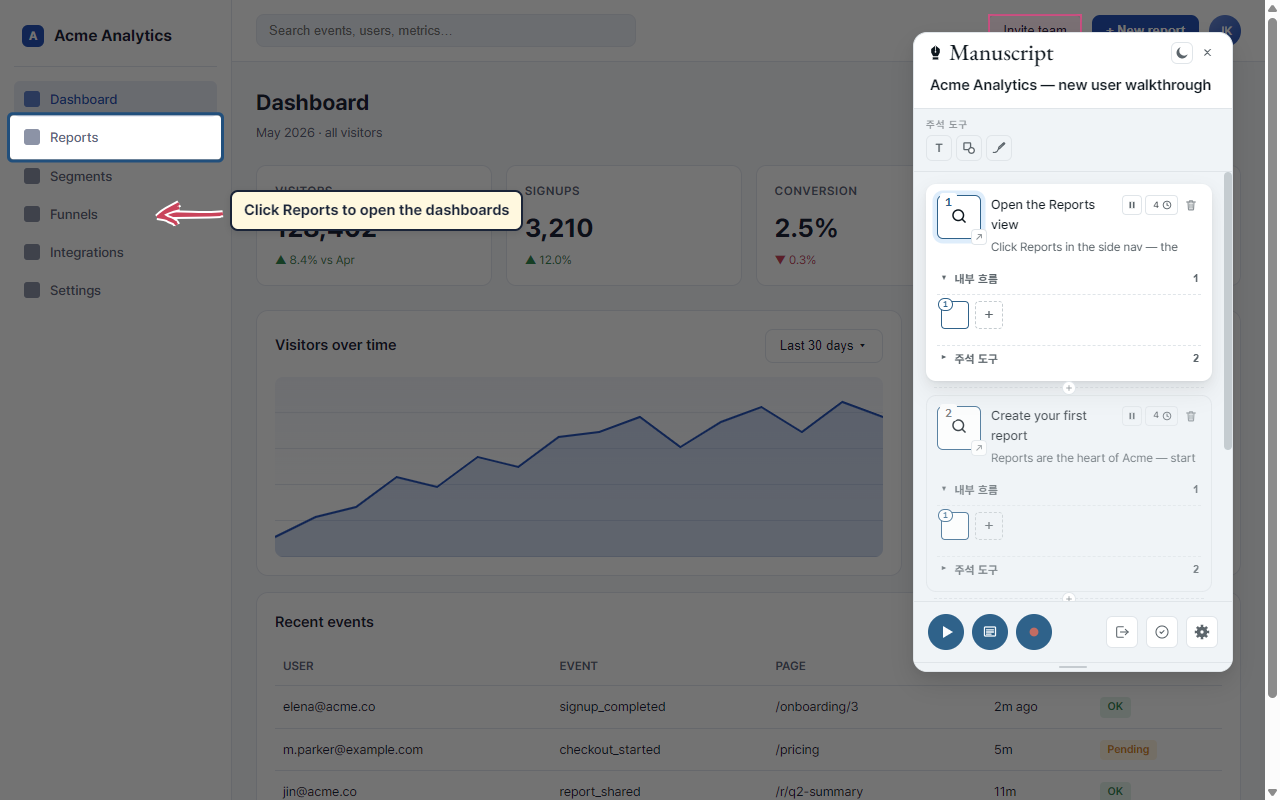
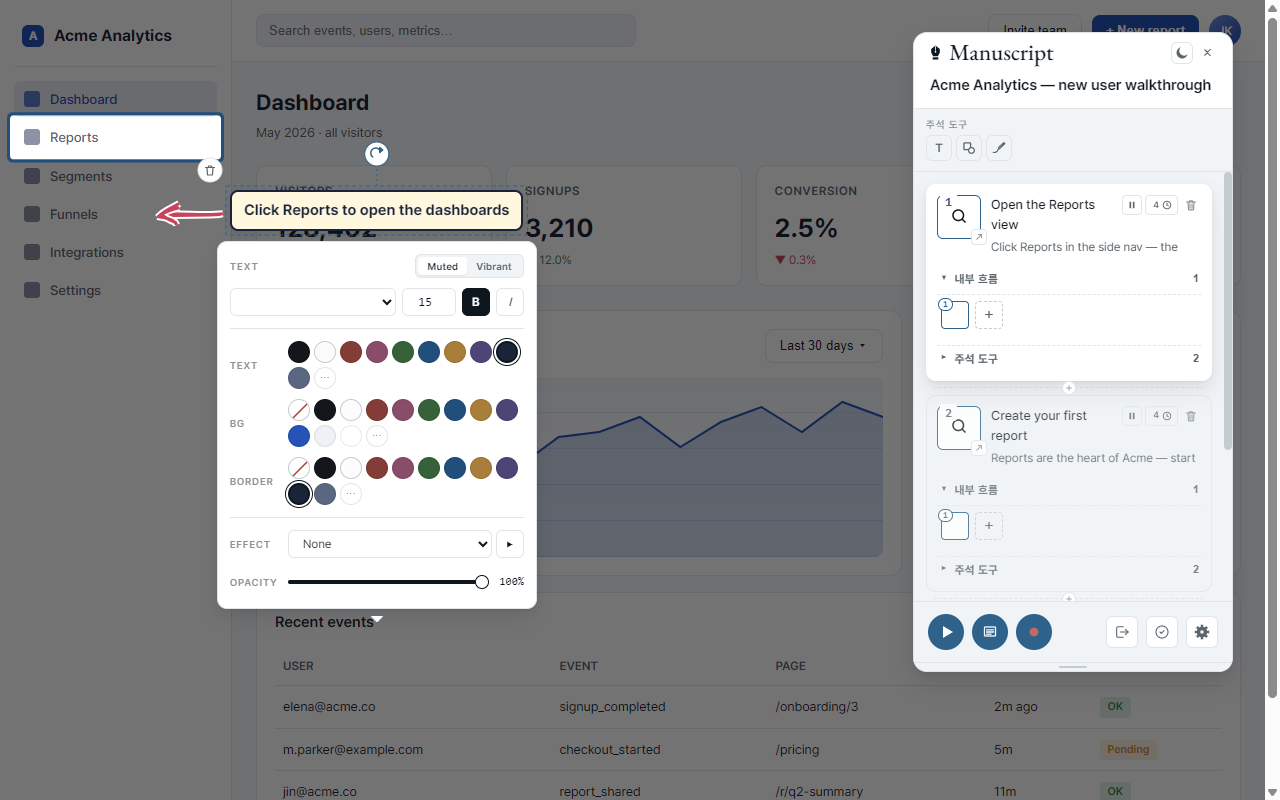
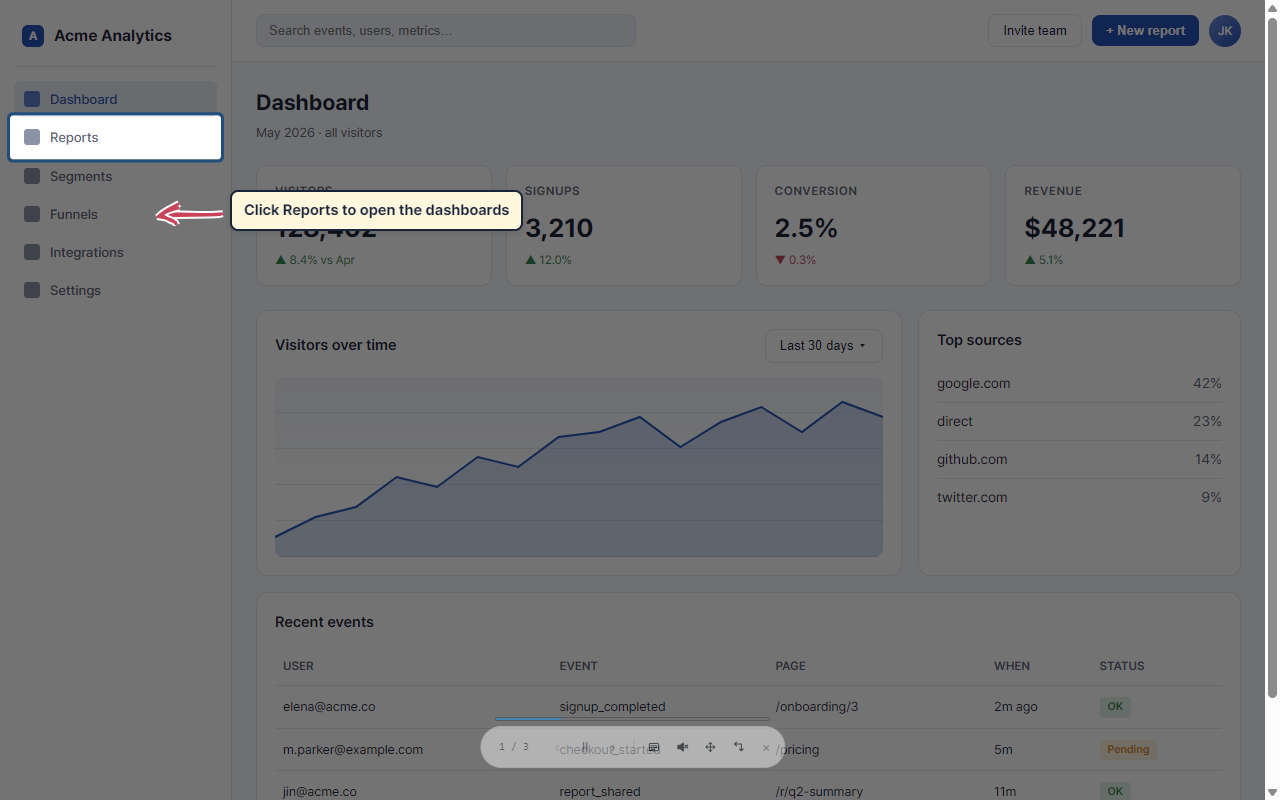
Manuscript demo — floating panel, spotlight, and annotations over a web page Watch the demo
Manuscript 소개 — 작성 패널, 강조 표시, 주석을 페이지 위에 소개 영상 보기

What's inside

핵심 기능

Six little touches that make it nice.

마음에 들 만한 여섯 가지.

Stays put when pages change

페이지가 바뀌어도 그대로

Manuscript remembers the parts of your page in three ways at once, so a small redesign or text tweak won't make your tour go missing.

Manuscript 는 페이지의 위치를 세 가지 방법으로 기억해 둡니다. 약간의 디자인이나 글자 변경에도 시연이 사라지지 않아요.

Works inside embedded frames

임베드된 화면 안도 OK

Pages with embedded mini-pages inside (like documents or maps) work too. Pick whatever you want to highlight, even in there.

문서 미리보기나 지도처럼 페이지 안에 또 다른 화면이 들어 있어도, 그 안의 요소까지 함께 강조할 수 있어요.

Keeps going to the next page

다음 페이지로 자연스럽게

Mark a step as "wait for a click". When someone clicks and the site moves to the next page, your tour picks right back up. Sites that switch screens with a query or hash address (?tab=, #/reports) are handled too — just turn on full-URL matching in the settings.

"클릭을 기다리는" 스텝을 만들 수 있어요. 사용자가 버튼을 눌러 다른 페이지로 넘어가도 시연은 새 페이지에서 자연스럽게 이어집니다. 쿼리나 해시로 화면이 바뀌는 사이트(?tab=, #/reports)도 설정에서 전체 URL 일치만 켜면 그대로 따라갑니다.

Friendly notes and arrows

친근한 메모와 화살표

Add a short note, a circle, an arrow, or a hand-drawn doodle. They can fade in, slide in, or bounce — your call.

짧은 메모·동그라미·화살표·손그림 낙서까지 더할 수 있어요. 등장 방식도 페이드·슬라이드·통통 튀기 중에서 골라 보세요.

Reads your tour out loud

설명을 소리 내어 읽어줘요

Type a short description for each step and Manuscript will speak it during playback. Arrow keys move between steps, Space pauses, Esc exits.

각 스텝에 짧은 설명을 적어 두면 재생할 때 목소리로 읽어줍니다. 방향키로 이동, Space 로 일시정지, Esc 로 종료.

Speaker notes window

발표자 노트 창

Move the script and controls to a second screen. You read the notes, the audience watches the tour — no need to memorise anything.

대본과 컨트롤을 두 번째 화면으로 옮길 수 있어요. 내가 노트를 보면서 진행하면, 청중에게는 깔끔한 시연만 보입니다.

How it works

이렇게 만듭니다

Five easy steps, start to finish.

다섯 단계면 끝납니다.

1

Open Manuscript

매뉴스크립트 열기

Click the Manuscript icon in your toolbar and choose New Manuscript. A small panel slides in next to the page, ready to use. It also borrows the page's colors and fonts so your tour fits right in.

브라우저 도구막대의 매뉴스크립트 아이콘을 누르고 새 매뉴스크립트를 선택하세요. 페이지 옆에 작은 작업 패널이 나타나고, 페이지의 색과 글꼴까지 자연스럽게 따라가 한 화면처럼 어울립니다.
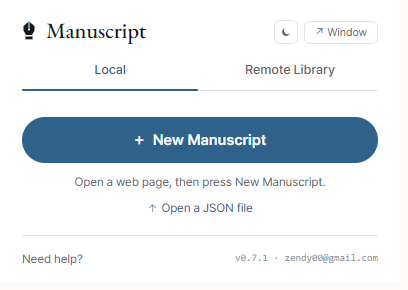
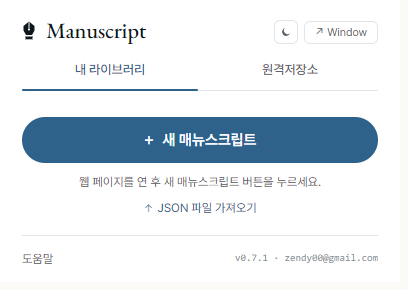
Manuscript popup with the New Manuscript button 매뉴스크립트 팝업 — 새 매뉴스크립트 버튼
2

Tap the part you want to show

강조하고 싶은 곳을 클릭

On each step, click the small wand to start picking. Hover over the page and a pink outline follows your mouse — click once to lock in your target. That part shines while everything else softly dims.

각 스텝의 작은 픽커 버튼을 누른 다음 페이지 위로 마우스를 움직이면 분홍색 테두리가 따라옵니다. 원하는 곳을 한 번 클릭하면 그 부분만 또렷이 강조되고 나머지는 살짝 어두워져요.
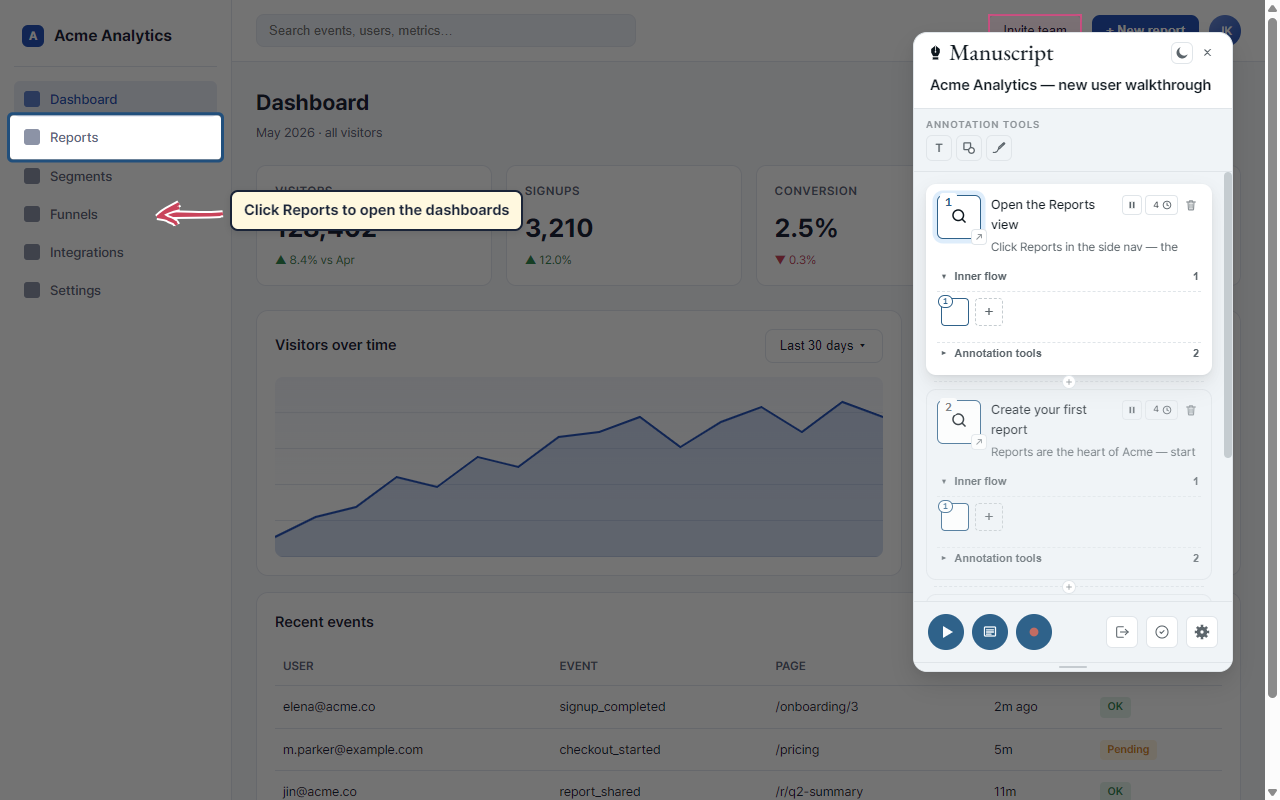
A page element being picked, surrounded by a pink outline 페이지 요소가 선택되는 모습 — 분홍색 outline 으로 둘러싸여 있음
3

Add a note, shape, or doodle

메모·도형·낙서 더하기

Press for a text box, pick one of eight shapes, or sketch with the freehand tool. Click anything you've added to change its color, font, or how it floats in.

버튼으로 텍스트 상자, 여덟 가지 도형, 손그림까지 자유롭게 더할 수 있어요. 추가한 항목을 클릭하면 색·글꼴·등장 효과를 그 자리에서 바꿀 수 있습니다.
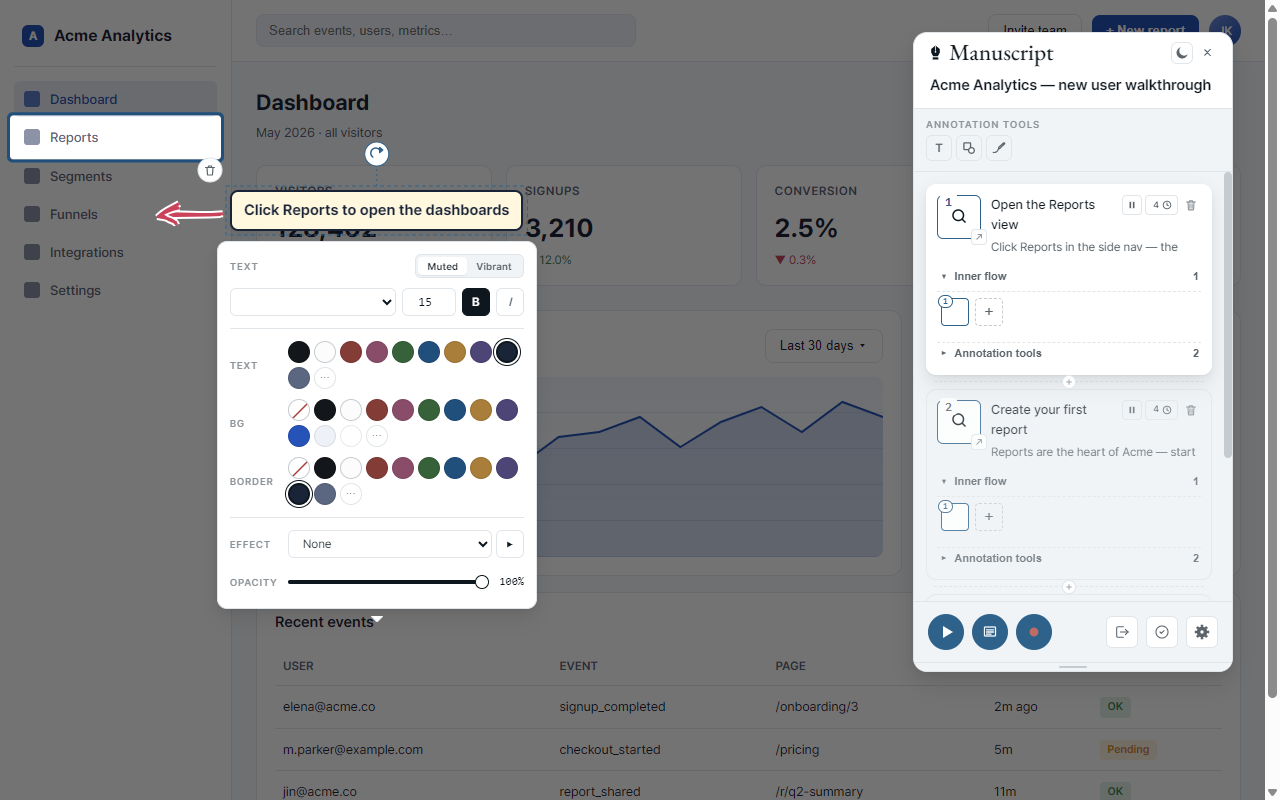
Annotation editor showing color and font options 색·글꼴 옵션이 보이는 annotation 편집기
4

Build out the rest of the tour

나머지 단계 차곡차곡

Use the between cards to insert a step, or the bigger at the end to add one. Drag cards around to reorder. Click any card and the page scrolls to that step with the spotlight on.

카드 사이의 로 중간에 끼워넣고, 맨 아래 큰 로 새 단계를 추가합니다. 카드를 끌어서 순서를 바꿀 수도 있어요. 카드를 누르면 그 단계로 페이지가 자연스럽게 이동하면서 강조 표시가 나타납니다.
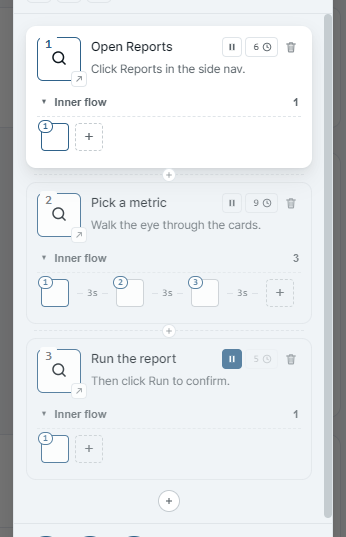
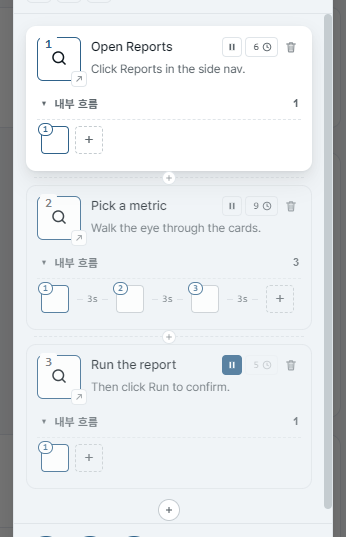
Floating panel with several step cards 패널에 쌓여 있는 스텝 카드들
5

Press play — and you're done

재생만 누르면 완성

Tap at the bottom of the panel to start the tour. A small playback bar appears. Use to move, Space to pause, Esc to exit. Want to read your notes on another screen? Pop out the speaker-notes window.

패널 아래쪽의 를 누르면 시연이 시작됩니다. 작은 재생 바가 나타나요. 로 이동, Space 로 일시정지, Esc 로 종료. 노트를 다른 화면에서 보고 싶다면 발표자 노트 창을 따로 띄울 수 있어요.
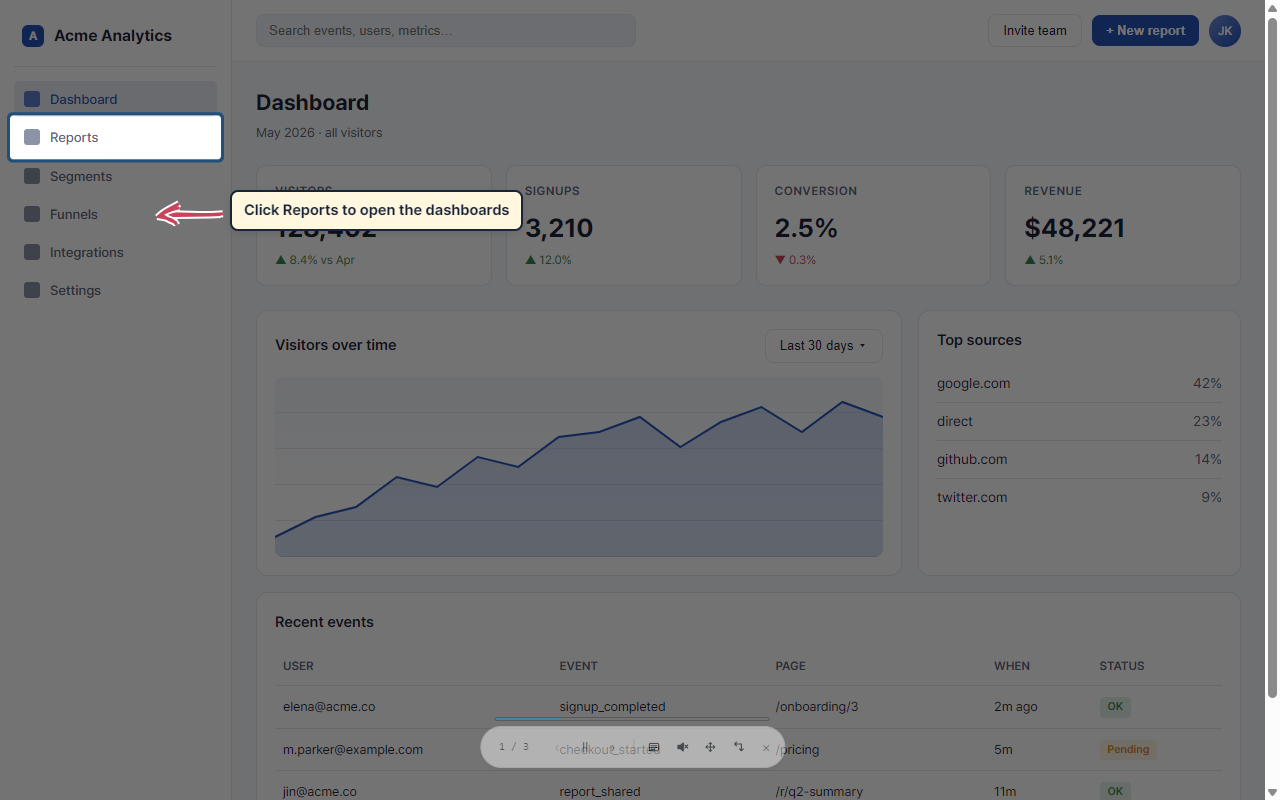
Replay controls bar at the bottom of the screen with a spotlight 화면 하단의 재생 컨트롤 바와 spotlight

★ Output as video

★ 동영상 출력

Turn your tour into a video.

내가 만든 시연을 동영상으로.

Press one button and your tour plays itself into a video file — just the page, none of the editing tools in the way. Spotlights, notes, the voice narration — everything lands neatly inside. It stops on its own when the tour is finished, then asks you where to save it.

버튼 하나만 누르면 내가 만든 시연이 스스로 재생되어 동영상 파일로 저장됩니다. 편집 도구는 화면에서 사라지고 페이지만 깔끔하게 담깁니다. 강조 표시·메모· 음성 안내까지 영상에 그대로 들어갑니다. 시연이 끝나면 자동으로 멈추고 저장할 위치를 물어봐요.

Want to chip in with your own voice along the way? Tap Space while you're recording and the tour pauses — the video keeps rolling, so you can speak up, click around, or just catch your breath. Tap Space again to pick the tour back up. Turn on Also record my microphone in the recorder window first if you want your voice baked right into the video alongside the read-aloud narration.

녹화 도중에 내 목소리로 한마디 보태고 싶으면? 녹화 중에 Space 키를 누르면 시연이 잠깐 멈춰요. 그동안에도 녹화는 계속되니까, 직접 설명을 보태거나, 페이지를 클릭해서 뭔가 보여주거나, 잠깐 숨을 고르세요. Space를 다시 누르면 시연이 이어집니다. 녹화 창에서 내 목소리도 함께 녹음을 켜 두면 내가 말한 내용이 읽어주는 안내와 함께 영상에 자연스럽게 담겨요.

  • Just the page — the editor panel and controls slide out of view while you record, and the page goes fullscreen.
  • Spans multiple pages — if your tour moves between pages, the recording follows along and lands as one continuous video.
  • 3-second countdown so you can get ready, with a Cancel button or Space / Esc to back out.
  • Voice narration included — the spoken descriptions are captured along with the video.
  • Pause anytime to chip in — tap Space while recording and the tour holds still. The video keeps rolling, so you can speak up, click around, or just collect your thoughts. Space again picks it back up.
  • Bring your own voice (optional) — turn on "Also record my microphone" in the recorder window and your voice lands in the video alongside the read-aloud narration.
  • Stops by itself when the tour reaches the end. Want to stop sooner? Just press Esc anywhere on the page.
  • You pick where it saves — the browser's Save dialog opens when the tour ends. Nothing is uploaded; everything stays on your computer.
  • 페이지만 담깁니다 — 녹화 중에는 편집 패널과 컨트롤이 화면에서 사라지고, 페이지가 전체 화면으로 바뀌어요.
  • 여러 페이지도 OK — 시연이 페이지를 오가도 녹화가 따라가면서 하나의 영상으로 이어집니다.
  • 3 초 카운트다운으로 마음의 준비를 할 시간이 있고, 취소 버튼이나 Space / Esc 로 언제든 멈출 수 있어요.
  • 음성 안내까지 함께 — 읽어주는 설명도 영상에 그대로 담깁니다.
  • 언제든 잠깐 멈추고 거들 수 있어요 — 녹화 중에 Space 키를 누르면 시연이 멈춥니다. 녹화는 그대로 계속되니까 한마디 보태거나, 페이지를 클릭해서 뭔가 보여주거나, 잠깐 생각을 정리할 수 있어요. Space를 다시 누르면 시연이 이어집니다.
  • 내 목소리도 함께 (선택) — 녹화 창에서 "내 목소리도 함께 녹음"을 체크하면 내가 말한 내용이 읽어주는 안내와 함께 영상에 담깁니다.
  • 알아서 멈춥니다 — 시연 마지막에 자동으로 종료. 더 일찍 끝내고 싶으면 페이지 아무 곳에서 Esc 키만 누르세요.
  • 저장 위치는 직접 선택 — 시연이 끝나면 브라우저의 "다른 이름으로 저장" 다이얼로그가 뜹니다. 어디로도 업로드되지 않고 컴퓨터 안에만 남습니다.

For AI agents

AI 에이전트용

Author with an AI agent.

AI 에이전트로 작성하세요.

Hand SKILL.md to an AI agent along with the URL you want to tour. The agent emits a Manuscript scenario JSON — ready to load and play.

SKILL.md 와 시연할 페이지 주소를 AI 에이전트에게 전달하면, Manuscript 시나리오 JSON 을 만들어 줍니다. 그대로 불러와 재생만 누르면 됩니다.

1

Pick a URL

URL 준비

The page you want a tour of.

시연하고 싶은 페이지 주소를 정합니다.

2

Hand SKILL.md + URL to your agent

SKILL.md 와 URL 을 에이전트에 전달

Claude, Cursor, Windsurf, Cline, ChatGPT — anywhere you talk to an AI works.

Claude, Cursor, Windsurf, Cline, ChatGPT 등 AI 에이전트라면 어디서나 동작합니다.

3

Load the JSON in Manuscript

받은 JSON 을 Manuscript 로 불러오기

Import the file, press play. Manuscript finds each spot on the page for you.

파일을 불러오고 재생만 누르면, Manuscript가 각 요소의 위치를 알아서 찾아갑니다.

Example prompt

예시 프롬프트

Use SKILL.md. Generate a Manuscript tour for
https://example.com/dashboard. English, 6 steps.

AI authoring is a head start, not a finishing line. Open the JSON in Manuscript and review the steps before you share — Manuscript remembers each spot three different ways, so the tour keeps playing even when the AI's first guess isn't quite right.

AI 작성은 출발점일 뿐이니, JSON 을 Manuscript 로 불러와 한 번 확인한 다음 공유하세요. Manuscript 는 각 자리를 세 가지 방법으로 기억하기 때문에, AI 의 첫 시도가 완벽하지 않아도 시연이 끊기지 않습니다.

★ Shared library NEW v0.7.0

★ 공유 라이브러리 NEW v0.7.0

A team's tours, from their repo.

팀의 시연을, 리포에서 그대로.

Hand a public GitHub repo to Manuscript and the popup gains a Remote Library tab. Tours your team pushes to that repo show up there, ready to play in any tab — no JSON file handoff, no manual import, no second copy in your library to keep in sync.

GitHub 공개 리포 주소를 매뉴스크립트에 알려주면 팝업에 원격저장소 탭이 생깁니다. 팀이 그 리포에 푸시한 시연이 거기 그대로 떠서, 어느 탭에서든 바로 재생할 수 있어요 — JSON 파일을 주고받거나, 직접 가져오기 하거나, 내 라이브러리에 사본을 두고 동기화할 필요 없이.

Connect a GitHub repo

GitHub 리포 연결

Paste a repo URL (or just owner/repo) in the Remote Library tab and the catalog populates from the files at the repo root or whatever folder you point at. Each scenario shows its title and step count — click the manuscript icon to play. Sub-folders are navigable too, with a small back chip at the top.

원격저장소 탭에 리포 URL (혹은 짧게 owner/repo) 만 붙여넣으면, 리포 루트나 지정한 폴더의 시나리오 목록이 채워집니다. 시나리오마다 제목과 단계 수가 보이고, 매뉴스크립트 아이콘을 누르면 재생돼요. 하위 폴더도 들어갈 수 있고, 위쪽 작은 ← 표시로 다시 나옵니다.

The popup's Remote Library tab listing scenarios from a GitHub repo 팝업 원격저장소 탭에서 GitHub 리포의 시나리오 목록

Edits won't be saved important

편집은 저장되지 않습니다 꼭 알아두세요

Every remote play opens with a sticky banner above the panel header that names the source (📡 owner/repo · file.json) and reminds you that edits are temporary. The teammate who owns the repo is the only one whose version is authoritative — your tweaks live just for this play, and the next refresh brings their copy back untouched.

원격저장소 시나리오를 재생할 때마다 패널 위쪽에 작은 배너가 떠서, 어디서 온 시나리오인지 (📡 owner/repo · file.json) 알려주고 편집해도 저장되지 않는다고 분명히 안내합니다. 리포 주인의 버전이 진본이라서, 내가 만진 부분은 이번 재생에만 남고 다음에 다시 열면 원본 그대로예요.

The in-panel banner: 'Edits won't be saved' with a Save to local button 패널 배너: '편집은 저장되지 않습니다' + 내 라이브러리에 저장 버튼

Save to local — when you want to keep a copy

내 라이브러리에 저장 — 갖고 있고 싶을 때

Made changes you don't want to lose? The banner has a Save to local button right there. One click promotes the current scenario into your own library with a fresh id, the banner disappears, and you're back in normal editing mode — your copy now, with no link back to the repo.

편집한 내용을 잃고 싶지 않다면 배너의 내 라이브러리에 저장 버튼을 누르세요. 지금 재생 중인 시나리오가 새 id 로 내 라이브러리에 들어가고, 배너는 사라지고, 평소처럼 편집·저장이 됩니다 — 그때부터는 내 사본이고, 리포와는 분리돼요.

After clicking Save to local — the scenario appears in the Local tab 내 라이브러리에 저장 클릭 후 — 시나리오가 내 라이브러리 탭에 등장

Install

설치

Two ways in — pick the one that fits.

두 가지 설치 방법 — 본인에게 맞는 쪽으로.

Most people want the Web Store path — one click and the browser handles updates. If you'd rather test the latest dev build before it clears Web Store review, the manual .zip path below has you covered.

대부분은 웹 스토어 경로가 편합니다 — 한 번 클릭하면 브라우저가 업데이트까지 알아서 챙겨요. 웹 스토어 검수 전의 dev 빌드를 먼저 써보고 싶다면 아래 수동 .zip 경로를 골라주세요.

Web Store 웹 스토어 v… Manual .zip 수동 .zip v…

Manuscript is live on the extension store. Hit the button below, confirm Install Manuscript, and you're ready to go in seconds — the browser keeps it updated on its own.

Manuscript 는 확장 스토어에서 바로 받을 수 있습니다. 아래 버튼을 누르고 설치만 확인하면 몇 초 만에 준비 완료 — 업데이트는 브라우저가 알아서 챙겨줍니다.

→ Install Manuscript (Web Store)

→ Manuscript 설치 (웹 스토어)

  1. Click the button above — it opens Manuscript's page on the extension store.
  2. Hit Install, then Add extension when the browser asks to confirm.
  3. Click the puzzle-piece icon in the browser toolbar and pin Manuscript so it's always one click away.
  4. Open any regular web page (github.com, a help page, your own product) and click the Manuscript icon. The first time, the browser will ask for page access — say yes and you're ready to go.
  1. 위 버튼을 누르면 확장 스토어의 Manuscript 페이지가 열립니다.
  2. 설치 → 확인 창에서 확장 프로그램 추가 를 누릅니다.
  3. 브라우저 도구막대의 퍼즐 아이콘에서 Manuscript 를 고정해 두면 언제든 한 번 클릭으로 열 수 있어요.
  4. 아무 웹 페이지(github.com, 도움말 페이지, 본인의 사이트 등)를 열고 Manuscript 아이콘을 누르세요. 처음 한 번은 페이지 접근 권한을 묻는데, 허용하시면 바로 시연을 만들 준비가 끝납니다.
One small thing: Manuscript can't open on browser-internal pages (chrome://, edge://) or the new-tab page — the browser doesn't allow extensions there. If a tab was already open before you installed, just refresh it once.
잠깐 알려드릴 점: 브라우저 자체 페이지(chrome://, edge://) 와 새 탭에서는 동작하지 않아요 — 브라우저 정책으로 막혀 있습니다. 설치 전에 열려 있던 탭은 한 번만 새로고침해 주시면 됩니다.

How to use it

사용 설명서

A friendly handbook to walk you through.

처음부터 끝까지, 친절한 안내서.

1. Quick start

1. 퀵 스타트

Browser toolbar popup with the Manuscript icon — title at top, primary action button 'New Manuscript' below, 'Open a JSON file' below that, and the Previous Manuscripts list. Manuscript 도구막대 팝업 — 상단 타이틀, 기본 액션 '새 매뉴스크립트', 그 아래 'JSON 파일 가져오기', 이전 매뉴스크립트 목록.
The browser-action popup — start a new manuscript, open a JSON, or jump back into a previous one.
브라우저 액션 팝업 — 새 매뉴스크립트 시작, JSON 가져오기, 또는 이전 매뉴스크립트로 복귀.
  1. Open any regular web page (not chrome://, not the new-tab page).
  2. Click the Manuscript icon and hit New Manuscript.
  3. A floating panel appears top-right of the page. The page's theme color and fonts auto-populate the palette.
  4. Click the panel title to rename your manuscript (e.g. "Checkout walkthrough").
  5. Click the picker on a step card → hover the page → click the target element.
  6. Use the toolbar buttons (, shapes, freedraw) to layer annotations.
  7. Hit to replay. Use Space Esc.
  1. 일반 웹 페이지를 엽니다 (chrome://·새 탭 페이지에서는 동작하지 않아요).
  2. Manuscript 아이콘을 클릭하고 새 매뉴스크립트를 누르세요.
  3. 페이지 오른쪽 위에 작성 패널이 나타납니다. 페이지의 테마 색과 글꼴이 자동으로 팔레트에 들어와요.
  4. 패널 제목을 클릭해 이름을 바꿔 보세요 (예: "결제 페이지 가이드").
  5. 단계 카드의 선택 도구를 누른 뒤 페이지에서 원하는 부분에 마우스를 올리고 클릭하세요.
  6. 상단 주석 도구(, 도형, 손그림)로 설명을 덧붙입니다.
  7. 로 재생. 단축키 Space Esc.
Floating panel on the right edge of a page, just after creating a new manuscript — empty step list with a single 'Step 1' card, picker armed, palette across the top borrowed from the page's theme color, and footer controls. 페이지 오른쪽에 떠 있는 작성 패널 — 새 매뉴스크립트 직후 모습. 'Step 1' 카드 하나, 선택 도구 준비, 상단에 페이지 테마 색에서 가져온 팔레트, 하단 컨트롤 영역.
Floating panel right after New Manuscript — palette across the top (auto-populated from the page's theme color + fonts), one empty step card, picker ready to arm, footer with play / record / validate / export controls.
새 매뉴스크립트 직후의 작성 패널 — 상단 팔레트(페이지 테마 색·글꼴이 자동으로 들어옴), 빈 단계 카드 하나, 선택 도구 준비, 하단에 재생 / 녹화 / 점검 / 내보내기 컨트롤.

2. Picking elements

2. 요소 선택

When you pick an element, Manuscript writes down three different ways to find that same spot later. First, any internal name tag the page already attaches to it. Second, the words visible on the element together with where it sits on the page. Third, the location on the screen and the text right around it. If the page changes later, Manuscript tries each clue in turn until one of them lands on the right spot.

요소를 한 번 고르면 Manuscript 는 그 자리를 다시 찾기 위한 단서 세 가지를 적어 둡니다. 첫째 — 페이지가 그 요소에 붙여 둔 내부 이름표. 둘째 — 화면에 보이는 글자와 그 주변 위치. 셋째 — 화면 안에서의 위치와 근처에 있는 글자들. 나중에 페이지가 조금 바뀌어도 Manuscript 는 이 세 단서를 차례로 시도해 같은 자리를 다시 찾아냅니다.

Pages inside pages (iframe, one level deep): If the inner page comes from the same website, picking and playback both work. If it comes from a different website, the first click still registers, but the browser locks Manuscript out at playback time so that step shows a "couldn't find it" message. Pages nested two or more levels deep aren't supported yet.

페이지 안에 들어 있는 또 다른 페이지(iframe, 한 단계 깊이): 안쪽이 같은 사이트라면 선택과 재생 모두 정상으로 동작합니다. 안쪽이 다른 사이트라면 클릭은 등록되지만, 재생할 때 브라우저가 접근을 막아 "요소를 찾지 못했어요" 라는 안내가 뜹니다. 두 단계 이상 깊게 들어간 페이지는 아직 지원하지 않습니다.

A page with a pink rectangular outline tracking the mouse over a button — the picker is armed and the cursor reads as a crosshair. 페이지 위에서 선택 모드가 켜진 상태 — 분홍색 사각형 테두리가 마우스를 따라 움직입니다.
Picker armed — a pink outline tracks the mouse; one click locks the target and the spotlight darkens the rest of the page.
선택 모드가 켜진 상태 — 분홍색 테두리가 마우스를 따라옵니다. 클릭 한 번이면 그 자리가 고정되고 페이지의 나머지 부분이 어두워지면서 강조 표시가 나타나요.

Edit the ring & the dim background

강조 테두리·어두운 배경 편집

Once a step has a picked element, the spotlight draws a colored ring around the target and dims everything else. Both are per-step. Click the ring (the colored outline, not the inside) and a Spotlight popup opens — same swatch + slider model as the annotation property popup.

단계에 요소가 선택되어 있으면 강조 표시가 그 요소 둘레에 색 테두리를 그리고 나머지 페이지는 어둡게 처리합니다. 둘 다 단계 단위로 설정돼요. 테두리(요소 둘레의 색 띠)를 클릭 하면 강조 표시 속성 창이 열립니다 — 주석 속성 창과 같은 색 견본 + 슬라이더 구성이에요.

Spotlight property popup — Muted/Vibrant toggle at top right next to a SPOTLIGHT caption, Ring row with a swatch palette and a Width slider, divider, Dim row with a swatch palette and an Opacity slider, footer with 'Reset to default' button and a close X. 강조 표시 속성 창 — 상단 SPOTLIGHT 라벨과 Muted/Vibrant 토글, 테두리 줄에 색 견본 팔레트와 굵기 슬라이더, 구분선, 어두운 배경 줄에 색 견본 팔레트와 투명도 슬라이더, 하단 기본값 복원 버튼과 닫기 X.
The Spotlight property popup — Ring section (color + Width slider) on top, Dim section (color + Opacity slider) below, with the Muted / Vibrant swatch toggle and a Reset to default button along the edges.
강조 표시 속성 창 — 상단 테두리 영역(색 + 굵기 슬라이더), 하단 어두운 배경 영역(색 + 투명도 슬라이더). Muted / Vibrant 색 견본 토글과 기본값 복원 버튼이 가장자리에 배치돼 있습니다.
  • Muted / Vibrant toggle — same swatch set as the annotation editor, so the ring color stays in tone with annotations on the same step.
  • Ring color — 8 swatches in the current swatch mode. Default is the theme's primary blue (oklch(0.42 0.09 250)).
  • Width slider — 0 to 12 px. Default 3 px. Set to 0 to hide the ring while keeping the dim.
  • Dim color — same 8 swatches. Default black (#000000). The page outside the spotlight rect tints with this color.
  • Opacity slider — 0 to 100 %. Default 55 %.
  • Reset to default — clears the step's spotlight field. The spotlight falls back to the extension's hardcoded defaults.
  • × or click outside — closes the popup. Changes save as you edit; no separate apply step.
  • Muted / Vibrant 토글 — 주석 편집기와 같은 색 견본 묶음이라서, 테두리 색이 같은 단계의 주석과 자연스럽게 어울립니다.
  • 테두리 색 — 현재 모드의 색 견본 8 개. 기본값은 테마의 주 색(파랑).
  • 굵기 슬라이더 — 0 ~ 12 px. 기본 3 px. 0 으로 두면 테두리는 사라지고 어두운 배경만 남습니다.
  • 어두운 배경 색 — 같은 색 견본 8 개. 기본은 검정. 강조된 영역 바깥쪽 페이지가 이 색으로 덮입니다.
  • 투명도 슬라이더 — 0 ~ 100 %. 기본 55 %.
  • 기본값 복원 — 그 단계의 강조 표시 설정을 비웁니다. 비워두면 기본 스타일로 자동으로 그려져요.
  • × 또는 창 바깥 클릭 — 닫기. 변경은 그 자리에서 저장되며 별도의 적용 버튼은 없습니다.

Per-step, not global. Spotlight style is stored on each Step (Step.spotlight). To keep one tone across the whole manuscript, set the first step's spotlight and copy the values into the others — there's no global "apply to all" yet.

단계마다 따로 저장됩니다. 강조 표시 스타일은 단계 단위로 저장되기 때문에, 매뉴스크립트 전체에 같은 톤을 입히고 싶다면 첫 단계의 값을 다른 단계에 똑같이 맞춰 두세요. 아직 "모든 단계에 한꺼번에 적용" 옵션은 없습니다.

Authoring-only. The popup opens during authoring. During replay the ring click passes through so it doesn't interfere with action steps or page interactions.

편집 중에만 열립니다. 이 속성 창은 매뉴스크립트를 만들고 있을 때만 열려요. 재생 중에는 테두리 클릭이 그대로 통과돼 사용자가 페이지를 누르는 동작이나 액션 단계의 흐름을 방해하지 않습니다.

3. Annotation tools

3. 주석 도구

The palette across the top of the panel — labelled Annotation tools — holds three kinds: text, shape (8 sub-kinds: rectangle, ellipse, triangle, diamond, star, callout, line, block arrow), and freedraw (hand-drawn via rough.js). Click any annotation on the page to open its property popup.

패널 상단의 주석 도구 영역에 세 종류가 있습니다 — 글상자, 도형 (사각형·타원·삼각형·마름모·별·콜아웃·선·블록 화살표 8가지), 손그림 (rough.js). 페이지에 그려진 주석을 클릭하면 그 자리에 속성 popup이 열립니다.

Property popup

속성 창

  • Color — 8 swatches + site-extracted colors + custom picker.
  • Muted / Vibrant toggle — swaps the 8-swatch palette without changing the UI palette.
  • Font — site fonts first, then base fonts. With Asta Sans as a fallback so the font survives a page-context move.
  • Effect — Fade / Slide / Bounce / Zoom / Rotate 2× as an entry animation.
  • Opacity slider — separate for stroke, fill, text background.
  • 색상 — 색 견본 8 개 + 사이트에서 추출한 색 + 직접 색 고르기.
  • Muted / Vibrant 토글 — 패널 자체 색은 그대로 두고 색 견본 묶음만 두 톤으로 전환합니다.
  • 글꼴 — 사이트 글꼴이 먼저 나오고, 그다음 기본 글꼴. Asta Sans 가 예비 글꼴로 들어가 있어 페이지가 바뀌어도 글꼴이 유지돼요.
  • 등장 효과 — Fade / Slide / Bounce / Zoom / Rotate 2× 중 선택할 수 있습니다.
  • 투명도 슬라이더 — 선 / 채움 / 글상자 배경 각각 따로 조절합니다.
Annotation property popup showing font select, size, bold/italic, text/bg/border swatch rows, effect dropdown, and alpha slider 주석 속성 창 — 글꼴 선택, 크기, 굵게/기울임, 글자색·배경·테두리 색 견본 줄, 등장 효과 드롭다운, 투명도 슬라이더.
The property popup — font picker on top, swatch rows for Text / Bg / Border in the middle, Effect dropdown and Alpha slider at the bottom.
속성 창 — 상단 글꼴 선택, 가운데 글자색·배경·테두리 색 견본 줄, 하단 등장 효과 드롭다운과 투명도 슬라이더.

Per-step annotation list NEW v0.5.0

스텝별 주석 목록 NEW v0.5.0

Every step card now opens an Annotation tools (N) section that lists every text box, shape, and drawing on that step. Each row carries a small preview that reflects the actual colors and shape kind, so you can spot the right one at a glance.

단계 카드마다 주석 도구 (N) 영역이 열려 그 단계에 그려진 모든 글상자·도형·손그림을 한 줄씩 보여줍니다. 각 항목 옆 작은 미리보기에 실제 색과 도형 종류가 그대로 반영되어 한눈에 어느 항목인지 알아볼 수 있어요.

  • Click a row — opens that annotation's property panel. If the annotation belongs to another step, the panel switches step automatically. If it lives on another page, that page loads and the annotation is selected when it's ready.
  • Trash icon — removes the annotation from the step.
  • Header click — folds the list. The Inner flow section right above folds the same way.
  • 항목 클릭 — 해당 주석의 속성 패널이 열립니다. 다른 단계의 주석이면 단계가 함께 전환되고, 다른 페이지의 주석이면 그 페이지를 자동으로 불러와 선택해 줍니다.
  • 휴지통 아이콘 — 단계에서 해당 주석을 삭제합니다.
  • 머리글 클릭 — 목록을 접습니다. 바로 위의 내부 흐름 영역도 같은 방식으로 접고 펼 수 있어요.
Step card in the floating panel showing the Inner flow row and an expanded Annotation tools section with three rows — each row has a small kind icon (T, square, scribble) followed by a color-accurate mini preview, and a trash icon on the right. 플로팅 패널의 단계 카드 — 내부 흐름 줄과 펼쳐진 주석 도구 영역. 각 항목은 작은 종류 아이콘 (T, 도형, 손그림) + 실제 색이 반영된 미리보기 + 우측 휴지통 아이콘.
The annotation list inside a step card — color-accurate previews per kind, single-click to open the property popup, trash to delete. The Inner flow header above it folds and unfolds with the same gesture.
단계 카드 안 주석 목록 — 종류별로 실제 색이 반영된 미리보기, 클릭 한 번으로 속성 popup, 휴지통으로 삭제. 그 위의 내부 흐름 머리글도 같은 방식으로 접고 펼 수 있습니다.

Resize, rotate, animate

크기 조절·회전·애니메이션

Click an annotation to reveal handles. Corner drag = resize, top = rotate, bottom-left = delete. Rotation + animation combine, the annotation lands at the chosen angle.

주석을 클릭하면 모서리 손잡이가 나타납니다. 모서리를 드래그하면 크기 조절, 상단의 로 회전, 좌측 아래의 로 삭제. 회전과 등장 효과가 결합되어 최종 각도로 자연스럽게 안착합니다.

4. Steps & reorder

4. 스텝과 재배치

  • Insert between — small between cards.
  • Append — large at the bottom.
  • Reorder — drag a step card to move it.
  • Spotlight a step — click the card. The page auto-scrolls to the picked element and shows the spotlight.
  • Title & description — both editable directly on the card. Description doubles as the presenter note and is read aloud during replay.
  • Timer chip — click the seconds value on the top-right to set auto-advance.
  • Action toggle — pause icon on the top-right switches the step between auto-advance and wait-for-user-click.
  • Inner flow & Annotation tools NEW v0.5.0 — two collapsible sections at the bottom of the card. Click a header to fold or unfold; see §3 (Annotation tools) and §5 (Inner flow) for details.
  • 스텝 사이 삽입 — 카드 사이 작은 .
  • 끝에 추가 — 하단 큰 .
  • 순서 변경 — 스텝 카드를 드래그.
  • 스텝 spotlight — 카드 클릭. 페이지가 해당 요소로 자동 스크롤되고 spotlight 표시.
  • 제목 · 설명 — 카드에서 직접 편집 가능. 설명은 발표자 노트로 쓰이고 재생 중 음성으로 읽힙니다.
  • 타이머 chip — 카드 우상단 초 단위 값을 클릭해 자동 진행 시간 설정.
  • action 토글 — 우상단 일시정지 아이콘으로 자동 진행과 클릭 대기를 전환.
  • 내부 흐름 · 주석 도구 NEW v0.5.0 — 카드 하단의 두 영역. 머리글 클릭으로 접고 펼 수 있습니다. 자세한 동작은 §3 (주석 도구) 와 §5 (내부 흐름) 참고.
Floating panel with three step cards stacked vertically — each card shows a number badge, a thumbnail of its picked element, a title and description block, and the timer chip + action toggle in the corner. The middle step has an Inner flow timeline plus an Annotation tools section, both collapsible. 플로팅 패널에 세 개의 단계 카드가 세로로 쌓여 있는 모습 — 각 카드에 번호 배지, picked element 썸네일, 제목·설명 블록, 우상단의 타이머 chip 과 action 토글. 가운데 단계 카드에는 접고 펼 수 있는 내부 흐름 타임라인과 주석 도구 영역도 함께 보임.
Step cards stacked in the panel — drag to reorder, click between cards to insert, click a card to jump the spotlight to that step. Inner flow and Annotation tools sections at the bottom fold and unfold with their headers.
패널에 쌓인 단계 카드 — 드래그로 순서 변경, 카드 사이 클릭으로 끼워 넣기, 카드 클릭으로 그 단계로 spotlight 이동. 하단의 내부 흐름·주석 도구 영역은 머리글 클릭으로 접고 펼 수 있습니다.

5. Inner flow renamed v0.5.0

5. 내부 흐름 renamed v0.5.0

A single step can spotlight a row of related items in sequence while the same description plays — toolbar buttons, feature cards, form fields. The first element you pick is the main one; extra elements join the step's Inner flow section below the card and are visited one by one during replay with smooth transitions.

하나의 단계가 여러 요소를 순서대로 비춥니다 — 툴바 버튼, 카드 묶음, 폼 필드 같은 묶음. 처음 picker 로 잡은 게 대표 요소이고, 추가 요소는 단계 카드 아래 내부 흐름 영역에 줄지어 추가되어 재생 시 부드러운 전환으로 하나씩 강조됩니다. 단계의 설명이 읽히는 동안 움직여요.

Naming note (v0.5.0) — what used to be called "Sub-elements" is now Inner flow.

용어 변경 (v0.5.0) — 예전의 "보조 요소" 영역이 내부 흐름 으로 바뀌었습니다.

Adding sub-elements

내부 요소 추가

  • Below the step card, click the dashed + at the right end of the sub track. The picker turns on — click an element on the page to add it as a sub.
  • Subs have to live on the same page as the primary. If you've navigated to a different page, the picker refuses. Either go back to the original page, or rebuild the step from the right page.
  • When you add a new sub, the step's remaining time is split evenly across the primary and every sub.
  • 단계 카드 아래 내부 흐름 줄 오른쪽 끝의 점선 + 를 누르면 선택 모드가 켜집니다 — 페이지에서 원하는 부분을 클릭하면 그 자리에 추가됩니다.
  • 내부 요소는 대표 요소와 같은 페이지에서만 선택할 수 있습니다. 다른 페이지로 이동한 상태라면 선택이 거부돼요. 원래 페이지로 돌아가거나, 맞는 페이지에서 단계를 새로 만드세요.
  • 새 요소를 추가하면 단계의 남은 시간이 대표 요소와 추가된 모든 내부 요소에 똑같이 나눠집니다.
Floating panel step card with the sub-element track below — primary thumbnail labeled 1, sub thumbnails labeled 2, 3, 4 in a horizontal row, with the dashed plus button at the right end. 플로팅 패널 단계 카드 아래 내부 흐름 줄 — 대표 썸네일(1번), 추가된 내부 요소 썸네일(2, 3, 4번)이 가로로, 우측 끝에 점선 + 버튼.
Sub-element track on a step card — primary thumbnail (1), sub thumbnails (2, 3, 4), gap labels between them, dashed + at the right end to add a new sub.
단계 카드의 내부 흐름 줄 — 대표 썸네일(1번), 추가된 내부 요소들(2, 3, 4번), 그 사이의 시간 라벨, 우측 끝의 점선 + 로 새 요소 추가.

Numbered badges & replay order

번호 뱃지와 재생 순서

Each node in the sequence wears a circle badge: primary = 1, first sub = 2, second sub = 3, … The badge is the order the spotlight visits during replay. Smooth interpolated transitions (350 ms, ease-in-out-cubic) carry the spotlight from one node to the next.

각 요소에 동그라미 번호 배지가 붙습니다 — 대표 요소가 1, 첫 내부 요소가 2, 두 번째 내부 요소가 3 … 식이에요. 재생할 때 강조 표시가 이 번호 순서대로 옮겨갑니다. 요소 사이의 전환은 0.35 초 동안 부드럽게 흘러가요.

Timing model

시간 모델

  • The step's total time stays the same. The time spent on each node (primary + every sub) adds up to the step's auto-advance seconds. The auto-advance value is the reference; everything else fits inside it.
  • Drag a gap label (the marker between two nodes) to change how the time is split. The label slows down a touch so you can land it precisely; the other gaps stretch or shrink in proportion so the total doesn't change.
  • No node goes under 100 ms. Even the shortest step stays on each element for at least that long.
  • Voice narration runs separately. The step's description is read aloud once over the whole sub sequence, and the step waits for whichever finishes last — narration or the last sub.
  • 단계 전체 시간은 그대로 유지됩니다. 각 요소에 머무는 시간을 다 더하면 단계의 자동 진행 시간과 같아요. 자동 진행 값이 기준이고, 그 안에서 요소마다 나눠 갖습니다.
  • 요소 사이의 시간 라벨을 드래그하면 시간 배분이 바뀝니다. 라벨이 미세하게 따라오도록 살짝 제한이 걸려 있어 원하는 값에 정확히 멈출 수 있고, 다른 시간은 그만큼 비례해 늘거나 줄어 전체 시간은 그대로 유지됩니다.
  • 한 요소의 최소 시간은 0.1 초. 가장 짧게 잡아도 그만큼은 머무릅니다.
  • 음성 안내는 별도로 흐릅니다. 단계 설명은 내부 흐름 전체에 걸쳐 한 번 읽히고, 음성과 마지막 요소 중 늦게 끝나는 쪽까지 기다린 다음 다음 단계로 넘어갑니다.

Time-shift — pull a sub earlier / push later

시간 이동 — 요소를 앞당기거나 늦추기

When a sub is selected, two small chevron buttons appear at its bottom corners — pulls it 0.1 s earlier, pushes it 0.1 s later. Keyboard equivalents: / . The buttons appear on hover (and while a sub is selected), so they don't clutter the track when you're not adjusting timing.

내부 요소를 선택하면 그 아래 양쪽 모서리에 작은 화살표 버튼이 나타납니다 — 누르면 0.1 초 앞당기기, 누르면 0.1 초 늦추기. 키보드로는 / 로도 같은 동작이 됩니다. 버튼은 요소 위에 마우스를 올렸거나 선택된 상태일 때만 나타나서 평소엔 화면이 어수선하지 않아요.

  • One sub selected — only the gap just before it shrinks or grows. The sub plays for the same length of time, just earlier or later in the sequence.
  • A connected run selected — the whole run moves together. Gaps inside the run don't change.
  • The whole track selected — the same rule applies to the time at the start (primary) and the time at the end (last sub).
  • Nothing happens if a 0.1 s shift would squeeze any gap below 100 ms. Either select fewer items, or stretch the step's overall time.
  • 요소 하나 선택 — 그 요소 바로 앞 시간만 줄거나 늘어납니다. 요소 자체가 화면에 머무는 길이는 그대로이고, 단계 안에서 시작 시각만 앞이나 뒤로 옮겨가요.
  • 붙어 있는 여러 요소 선택 — 묶음 전체가 함께 이동합니다. 묶음 안쪽 시간은 변하지 않아요.
  • 전체 선택 — 시작(대표 요소가 머무는 시간) 과 끝(마지막 내부 요소가 머무는 시간) 양쪽에 같은 규칙이 적용됩니다.
  • 0.1 초 이동했을 때 어느 시간이라도 0.1 초 아래로 떨어지면 아무 변화도 일어나지 않습니다. 선택을 줄이거나, 단계 전체 시간을 늘려주세요.
Two sub thumbnails with the right one selected — the selected sub shows small ‹ and › chevron buttons at its bottom corners. 두 내부 요소 썸네일 중 오른쪽이 선택된 상태 — 선택된 요소 아래 모서리에 작은 ‹ 와 › 화살표 버튼.
Selected sub shows the ‹ › chevrons at its bottom corners. Hover the buttons or press ← / → to shift the sub by 0.1 s.
선택된 내부 요소의 양쪽 아래 모서리에 ‹ › 화살표 버튼이 나타납니다. 버튼을 누르거나 ← / → 키로 0.1 초씩 이동.

Multi-select & deletion

다중 선택과 삭제

  • Click a sub — select just that one and move the spotlight to that element.
  • Ctrl / Cmd + click — add or remove this sub from the current selection.
  • Shift + click — select the range from the last clicked sub to this one.
  • Esc or click outside the sub track — clear the selection.
  • Click the primary thumbnail (badge 1) — selects the primary instead of a sub and moves the spotlight back to it.
  • Delete / Backspace while subs are selected — removes them all. The remaining gaps share out the freed time so the step's total stays the same. If you're typing into a step name, description, or the panel title, the key is left alone so your typing isn't interrupted.
  • 클릭 — 내부 요소 하나만 선택하고 강조 표시가 그 요소로 이동합니다.
  • Ctrl / Cmd + 클릭 — 클릭한 요소를 현재 선택에 더하거나 빼기.
  • Shift + 클릭 — 마지막으로 클릭한 요소부터 이번 요소까지 범위 선택.
  • Esc 또는 줄 바깥을 클릭 — 선택 해제.
  • 대표 썸네일(1번 배지) 클릭 — 내부 요소 대신 대표 요소가 선택되고 강조 표시가 그쪽으로 돌아갑니다.
  • Delete / Backspace — 선택된 내부 요소가 모두 삭제됩니다. 남은 요소들이 비워진 시간을 나눠 가져 단계 전체 시간은 그대로 유지돼요. 단계 이름·설명·패널 제목에 글을 입력 중일 때는 이 키가 그대로 입력에 쓰여 작성에 방해되지 않습니다.

Reorder

재배치

Drag and drop with insert-between behavior. Drop on the left half of a sub to slip in before it, on the right half to slip in after. The gap labels between subs work as drop spots too, and a thin vertical bar shows you exactly where the sub will land while you're dragging. If you drag a sub that's part of the current selection, the whole selected group moves together and keeps its order; dragging a sub that's not selected moves just that one.

드래그 & 드롭 — 사이에 끼워 넣기 방식으로 동작합니다. sub 의 왼쪽 절반에 떨구면 그 앞에, 오른쪽 절반에 떨구면 그 뒤에 끼워집니다. sub 사이의 간격 라벨도 떨굴 수 있는 자리이며, 드래그하는 동안 얇은 세로 막대가 sub 가 정확히 어디에 들어갈지 미리 보여줍니다. 현재 선택에 포함된 sub 를 드래그하면 선택 묶음 전체가 순서를 유지한 채 함께 이동하고, 선택되지 않은 sub 를 드래그하면 그 sub 하나만 이동합니다.

Action steps + subs

Action 스텝과 sub 의 조합

When a step is an action step (wait for click) and also has sub-elements, the sub sequence plays through to the end first. After the last sub finishes its time on screen, the click-wait kicks in on the last sub's element — that's where the user clicks to advance to the next step.

스텝이 action 스텝 (클릭 대기) 이면서 sub 도 가지고 있으면, sub 시퀀스가 끝까지 재생된 다음 마지막 sub 요소에서 action 대기가 시작됩니다. 사용자는 마지막 sub 요소 를 클릭해서 다음 스텝으로 넘어갑니다.

Replay notes

재생 시 참고

  • Page scroll during transition is fine — the end rect is recomputed each frame so the spotlight tracks the real DOM position.
  • A sub that fails to resolve on the page is skipped with a warn — only the primary failing triggers the not-found recovery modal.
  • 전환 중 페이지 스크롤은 OK — 종료 rect 를 매 프레임 다시 계산해서 실제 DOM 위치를 따라갑니다.
  • sub 가 페이지에서 못 찾아지면 그 sub 만 건너뜁니다 (경고 표시) — primary 가 실패할 때만 not-found 복구 모달이 뜹니다.

6. Action steps

6. action 스텝

Turn a step into an action by clicking the pause icon on the card. During replay, an "Click or type in this area" bubble appears on the target element and auto-advance pauses until the user interacts. If the click navigates to a new URL, Manuscript resumes the manuscript on the new page automatically.

카드의 일시정지 아이콘을 클릭하면 그 스텝이 action 스텝으로 바뀝니다. 재생 중 대상 요소에 "이 영역을 클릭하거나 입력하세요" 버블이 뜨고 자동 진행이 멈춥니다. 사용자가 클릭해서 다른 URL로 이동해도 새 페이지에서 시연이 자동 재개됩니다.

Replay mode mid-tour — a button on the page is spotlighted with a tooltip-style bubble below it reading 'Click or type in this area' and a small chevron pointing back up at the button. 재생 중 action 스텝 — spotlight 가 대상 요소를 비추고 그 아래 '이 영역을 클릭하거나 입력하세요' 버블이 떠 있는 모습.
Action step during replay — the spotlight holds on the target and a "Click or type in this area" bubble waits for the user. Auto-advance pauses; the page navigation (if any) resumes the manuscript on the next page automatically.
재생 중 action 스텝 — spotlight 가 대상에 머무르고 "이 영역을 클릭하거나 입력하세요" 버블이 사용자 액션을 기다립니다. 자동 진행은 정지, 다른 URL 로 이동하면 새 페이지에서 시연이 자동 재개.

7. Replay & prompter

7. 재생과 프롬프터

Hit in the panel footer. A translucent control bar appears at the bottom — it gets a touch darker when you hover over it, and it remembers where you dragged it, even after the page navigates. The progress strip floats just above the control bar.

패널 하단의 로 재생을 시작합니다. 반투명 컨트롤 바가 하단에 나타나고, 마우스를 올리면 살짝 진해집니다. 드래그로 위치를 옮기면 페이지가 이동해도 그 위치 그대로 유지돼요. 진행 표시줄은 컨트롤 바 바로 위에 떠 있습니다.

Keyboard

키보드

  • / — previous / next step
  • Space — pause / resume
  • Esc — exit replay
  • / — 이전 / 다음 스텝
  • Space — 일시정지 / 재개
  • Esc — 재생 종료

Detached prompter

발표자 노트 분리

The prompter button in the panel's footer opens a separate browser window with a 3-column layout — step list on the left, the current step in the middle, the next one on the right. Same keyboard shortcuts as the panel, so you can drive the tour from a second screen.

패널 하단의 프롬프터 버튼을 누르면 별도 브라우저 창이 열립니다. 왼쪽에는 스텝 목록, 가운데에는 현재 스텝, 오른쪽에는 다음 스텝이 보이는 3 열 구조예요. 패널과 같은 단축키를 쓰니 두 번째 모니터에서 편하게 진행할 수 있습니다.

Detached prompter window with three columns — Steps list, Now (current step), Next — and a footer with counter, status, TTS toggle, and prev/pause/next controls 분리된 prompter 창 — 세 컬럼 (단계 목록, 현재, 다음) + 하단 카운터, 상태, TTS 토글, 이전/일시정지/다음 컨트롤
Detached prompter — Steps rail on the left, current step in the middle, upcoming step on the right, with counter and controls along the bottom.
분리된 프롬프터 — 좌측 스텝 목록, 중앙 현재 스텝, 우측 다음 스텝, 하단에 카운터와 컨트롤.

Voice narration

음성 안내

Toggle the speaker icon on the control bar (or in the prompter window's footer). Step descriptions are read out loud by the browser's built-in voice. Pick a voice in the panel's gear settings. Auto-advance waits for the narration to finish before moving on.

컨트롤 바(또는 프롬프터 창 하단)의 스피커 아이콘으로 켜고 끕니다. 스텝 설명을 브라우저 내장 음성으로 읽어 주고, 사용할 목소리는 패널의 기어(설정) 메뉴에서 고를 수 있어요. 자동 진행은 음성이 끝날 때까지 기다린 다음 다음 스텝으로 넘어갑니다.

Matching pages with a query or hash NEW v0.5.1

쿼리·해시가 있는 페이지 알아보기 NEW v0.5.1

When you play a manuscript, Manuscript checks that you're on the right page by its web address. Normally it looks only at the main address and ignores everything after the ? or # — that way a tracking link like ?utm_source=email never makes it think you're on the wrong page.

매뉴스크립트를 재생할 때 Manuscript 는 웹 주소를 보고 지금 맞는 페이지인지 확인합니다. 평소에는 주소의 본체만 보고 ?# 뒤쪽은 무시해요. 그래야 ?utm_source=email 같은 추적용 링크 때문에 엉뚱한 페이지로 오해하지 않거든요.

But some sites switch what's on screen using exactly that part — think ?tab=billing or a #/reports address. On those, every step can share the same main address while the screen is completely different, so playback could start on the wrong view or stop moving between steps. The fix: open the gear settings in the panel footer and turn on Match full URL (query & hash). Manuscript then treats those addresses as different pages, so the wrong-page warning and the automatic jumps between steps work the way you'd expect. Leave it off for ordinary sites.

그런데 어떤 사이트는 바로 그 뒷부분으로 화면을 바꿉니다 — ?tab=billing 이나 #/reports 같은 주소처럼요. 이런 사이트는 단계마다 주소 본체는 같은데 화면은 전혀 다를 수 있어서, 재생이 엉뚱한 화면에서 시작하거나 단계 사이를 못 넘어갈 수 있어요. 이럴 땐 패널 하단의 기어(설정) 메뉴를 열고 전체 URL 일치 (쿼리·해시) 를 켜세요. 그러면 Manuscript 가 그 주소들을 서로 다른 페이지로 보고, 페이지가 다르다는 경고와 단계 사이 자동 이동이 제대로 동작합니다. 일반 사이트에서는 꺼 두면 됩니다.

The panel's gear settings popup open — under the narration voice picker, a divider, then a 'Match full URL (query & hash)' checkbox with a one-line explanation. The gear button sits in the panel footer just below. 패널의 기어(설정) 팝업이 열린 모습 — 내레이션 음성 선택 아래에 구분선, 그 아래 '전체 URL 일치 (쿼리·해시)' 체크박스와 한 줄 설명. 기어 버튼은 바로 아래 패널 하단에 있습니다.
Gear settings in the panel footer — "Match full URL (query & hash)" sits under the narration voice picker. Off by default; turn it on only for query/hash-routed sites.
패널 하단의 기어(설정) — "전체 URL 일치 (쿼리·해시)" 가 내레이션 음성 선택 아래에 있어요. 기본은 꺼짐이고, 쿼리·해시로 화면이 바뀌는 사이트에서만 켜면 됩니다.

Edit a step from the prompter NEW v0.5.0

발표자 창에서 단계 편집 NEW v0.5.0

While the prompter is paused, the current step card in the middle column doubles as a light editor. Click any field below, type, then click away — the change saves on the spot. Pressing play after an edit rewinds that step so the timer, the highlight walk, and the spoken narration all start over with the new content.

발표자 창이 일시정지 상태일 때는 가운데 단계 카드가 가벼운 편집기 역할을 합니다. 아래 항목을 클릭해 입력한 뒤 다른 곳을 클릭하면 자동 저장돼요. 편집 후 재생 버튼을 누르면 그 단계가 처음으로 돌아가 타이머·강조 표시·음성 안내가 모두 새 내용으로 다시 시작됩니다.

  • Title and description — click the text and type. Tab moves between fields, click away to save.
  • Action toggle — the small badge next to the timer switches the step between auto-advance and wait-for-click.
  • Step timer — click the ⏱ 9.5s badge and type a new number. The number is pre-selected so you can replace it in one keystroke.
  • Each inner element's screen time — if the step walks through inner-flow elements, they stack vertically under the main thumbnail with each duration underneath. Click one to select it, then / nudges its time by 0.1 seconds. The step's total length stays the same. Press Esc to clear the selection.
  • 제목과 설명 — 글자를 클릭하고 바로 입력. Tab 으로 다음 칸 이동, 다른 곳을 클릭하면 저장.
  • 액션 토글 — 타이머 옆 작은 배지로 자동 진행 ↔ 클릭 대기를 전환합니다.
  • 단계 타이머 — ⏱ 9.5s 배지를 클릭하고 새 숫자를 입력하세요. 들어가면 숫자가 선택돼 있어 그대로 새 값을 입력하면 됩니다.
  • 각 내부 요소가 화면에 머무는 시간 — 단계가 여러 요소를 순서대로 보여주는 경우, 발표자 창에 대표 썸네일 아래로 요소들이 세로로 쌓이고 각 요소 아래에 머무는 시간이 표시됩니다. 한 요소를 클릭해 선택한 뒤 / 키로 0.1 초씩 조절하세요. 단계 전체 시간은 그대로 유지됩니다. Esc 키로 선택을 해제할 수 있어요.
Prompter window in paused state with the middle column showing inline-editable fields — title and description are highlighted, the timer pill shows ⏱ 9.5s with the number selected, and inner-flow rows stack under the main thumbnail with one row selected (highlighted) and its dwell time visible underneath. 일시정지 상태의 발표자 창 — 가운데 컬럼의 제목·설명이 편집 가능, 타이머 배지 ⏱ 9.5s 의 숫자가 선택된 상태, 대표 썸네일 아래 내부 흐름 요소들이 세로로 쌓여 있고 한 요소가 강조 선택된 모습 + 각 요소 아래의 머무는 시간 표시.
Paused prompter as a light editor — title, description, action badge, timer (number-only), and per-element screen time all editable in place. Select an inner element with a click, then ← / → nudges its time ±0.1 seconds.
일시정지 상태의 발표자 창이 가벼운 편집기로 — 제목·설명·액션 배지·타이머 (숫자만) 와 내부 요소별 머무는 시간을 그 자리에서 수정. 내부 요소를 클릭해 선택하면 ← / → 키로 ±0.1 초씩 조절.

Paused only. The editor opens while the prompter is paused. Press play after an edit to replay that step from the top with the new copy.

일시정지 상태에서만. 편집기는 발표자 창이 일시정지 상태일 때 열립니다. 편집 후 재생 버튼을 누르면 그 단계가 새 내용으로 처음부터 다시 재생돼요.

8. Recording updated v0.6.0

8. 녹화 updated v0.6.0

The red button in the panel footer turns your tour into a video file. A separate recorder window opens to run it — it plays the whole tour by itself, keeps every Manuscript control off the page, and captures the voice narration along with everything on screen. It even keeps recording when your tour moves between pages, so a multi-page tour comes out as one continuous video. When the last step finishes it stops on its own and hands you the file through the browser's normal save dialog.

패널 아래쪽의 빨간 버튼이 만들어 둔 시연을 동영상으로 만들어 줍니다. 녹화를 진행하는 별도의 녹화 창이 열려요 — 시연을 스스로 끝까지 재생하면서, Manuscript 도구는 페이지에 내보내지 않고, 화면에 보이는 것과 음성 안내를 함께 담습니다. 시연이 여러 페이지를 오가도 녹화가 끊기지 않아서, 여러 페이지짜리 시연도 하나의 영상으로 이어져요. 마지막 단계가 끝나면 알아서 멈추고, 브라우저의 저장 다이얼로그로 파일을 건네줍니다.

The Manuscript recorder window — a 'this window is not recorded' note, a screenshot of the browser's share dialog with the Window tab and 'Also share system audio' highlighted, an 'Also record my microphone' option, and a Start recording button.
The recorder window. It walks you through the one share dialog — pick a Window and turn on Share system audio — with an optional microphone switch and the keyboard hints. This window controls the recording and never shows up in the video.
Manuscript 녹화 창 — '이 창은 녹화되지 않습니다' 안내, 브라우저 공유 다이얼로그에서 창 탭과 '시스템 오디오 공유'가 강조된 스크린샷, '내 목소리도 함께 녹음' 옵션, 녹화 시작 버튼.
녹화 창이에요. 공유 다이얼로그 진행을 짚어 줍니다 — 창(Window)을 고르고 시스템 오디오 공유를 켜세요 — 마이크 옵션과 단축키 안내도 함께. 이 창이 녹화를 제어하고, 영상에는 들어가지 않습니다.

How to record

녹화 방법

  1. Click the red in the panel footer.
  2. A small recorder window opens — it runs the recording and shows your script (the current and next step) as it plays. This window itself is never in the video. Pick the video qualityStandard suits most tours; choose High quality for crisper text (the file gets larger). Want your voice in there too? Turn on Also record my microphone, then click Start recording.
  3. The browser asks what to share. Pick a Window — your browser window, not a single tab — tick Also share system audio, then Share. That's what carries the voice narration into the video; skip it and the recording still runs, just silent.
  4. Your page jumps to fullscreen and a 3-2-1 countdown gives you a moment to get ready, then recording begins. The panel and control bar are already out of the frame.
  5. The tour plays itself. The recorder window keeps a red dot blinking the whole time so you can tell it's rolling. Tap Space to pause the tour (the recording keeps going); press Esc when you want to wrap up and save. It also stops on its own when the last step finishes.
  6. The browser's save dialog opens with a filename like manuscript-recording-YYYYMMDD-HHMM.webm.
  1. 패널 하단의 빨간 버튼을 클릭합니다.
  2. 작은 녹화 창이 열립니다 — 녹화를 진행하고, 재생되는 대로 대본(현재·다음 단계)을 보여줘요. 이 창 자체는 영상에 들어가지 않습니다. 영상 화질을 고르세요 — 대부분 일반 화질로 충분하고, 글자를 더 또렷하게 담고 싶으면 고화질을 고르면 됩니다(파일이 커져요). 내 목소리도 함께 담고 싶으면 내 목소리도 함께 녹음을 켜고 녹화 시작을 누르세요.
  3. 브라우저가 무엇을 공유할지 물어봅니다. 탭 하나가 아니라 창(Window) — 내 브라우저 창 — 을 고르고 시스템 오디오 공유를 체크한 뒤 공유를 누르세요. 음성 안내가 여기서 영상에 함께 담깁니다. 건너뛰면 녹화는 되지만 소리는 빠져요.
  4. 페이지가 전체 화면으로 바뀌고 3·2·1 카운트다운으로 잠깐 준비할 틈을 준 뒤 녹화가 시작됩니다. 패널과 컨트롤 바는 이미 화면 밖으로 빠져 있어요.
  5. 시연이 알아서 재생됩니다. 녹화 창에서는 빨간 점이 계속 깜빡여서 녹화 중이라는 걸 알 수 있어요. Space 로 시연을 잠깐 멈출 수 있고(녹화는 계속됩니다), 끝내고 저장하려면 Esc 를 누르세요. 마지막 단계가 끝나면 알아서 멈춥니다.
  6. manuscript-recording-YYYYMMDD-HHMM.webm 형태의 파일명으로 브라우저 저장 다이얼로그가 열립니다.

Multi-page tours record in one take NEW v0.6.0

여러 페이지 시연도 한 번에 NEW v0.6.0

If your tour walks across several pages, the recording follows along through every page change and stitches it all into a single video — no stopping and restarting for each page. Build your tour as usual and hit record; the recorder window stays open through the moves and keeps the take going.

여러 페이지를 오가는 시연이라면, 페이지가 바뀔 때마다 녹화가 따라가면서 전부 하나의 영상으로 이어 붙입니다 — 페이지마다 멈췄다 다시 시작할 필요가 없어요. 평소처럼 시연을 만들고 녹화만 누르면, 페이지를 이동하는 동안에도 녹화 창이 그대로 열려 있으면서 녹화를 계속 이어 갑니다.

Pause anytime to add your voice

잠깐 멈추고 내 목소리 보태기

The recorder window while recording — a red 'Recording' badge with a blinking dot, a 'Scenario playing' chip, a step counter, the step list, and the current and next step with their descriptions.
While it's rolling, the recorder window shows your script — the current and next step — with a step list and a red Recording badge that keeps blinking. The chip beside it flips between Scenario playing and Scenario paused when you tap Space.
녹화 중인 녹화 창 — 깜빡이는 점이 있는 빨간 '녹화 중' 배지, '시나리오 재생 중' 칩, 단계 카운터, 단계 목록, 그리고 현재·다음 단계와 설명.
녹화가 도는 동안 녹화 창은 대본 — 현재·다음 단계 — 을 단계 목록과 함께 보여주고, 빨간 녹화 중 배지가 계속 깜빡입니다. 옆의 칩은 Space 를 누를 때마다 시나리오 재생 중시나리오 일시정지 중 사이를 오갑니다.

Any time during recording, tap Space and the tour freezes where it is. The page holds still and the recorder window shows it's paused — but the red dot keeps blinking, because the recording never stopped. Now it's your turn: talk through what's on screen (if you turned the mic on), click around to show something interactive, or just catch your breath. Tap Space again and the tour picks up like nothing happened.

녹화 도중 언제든 Space 키를 누르면 시연이 그 자리에 그대로 멈춥니다. 화면은 멈춰 있고 녹화 창에는 일시정지 상태가 표시돼요 — 하지만 빨간 점은 계속 깜빡입니다. 녹화는 멈추지 않았거든요. 이제 내 차례 — 마이크를 켜 뒀다면 화면을 보면서 한마디 보태고, 직접 클릭해서 뭔가 보여주거나, 잠깐 숨을 고르세요. Space 를 다시 누르면 시연이 아무 일도 없었던 것처럼 이어집니다.

Want your voice in too?

내 목소리도 같이 담고 싶다면?

Turn on Also record my microphone in the recorder window before you start (it's off by default). Your voice mixes in alongside the read-aloud narration and the page sounds — everything ends up on one neat audio track. The browser only asks for microphone permission when this is on; the normal recording never bothers you with it.

녹화를 시작하기 전, 녹화 창에서 내 목소리도 함께 녹음을 켜 두세요 (기본은 꺼짐). 내가 말한 내용이 읽어주는 안내·페이지 소리와 함께 하나의 트랙으로 깔끔하게 담깁니다. 이 옵션을 켰을 때만 브라우저가 마이크 권한을 한 번 물어봐요 — 평소 녹화에서는 권한 창이 뜨지 않아요.

Limits & gotchas

제한 & 주의사항

  • Share a Window, not a Tab. When the browser asks what to share, pick a Window and turn on "Share system audio" — that's the only way the voice narration makes it into the video. A single tab can't carry the page's sound.
  • WebM video file. Most modern players open it just fine — Chrome, Edge, VLC, the built-in Media Player on Windows 11. Older Windows Media Player just needs Microsoft's free Web Media Extensions + VP9 Video Extensions from the Microsoft Store (Windows Update often slips these in for you already). Need an MP4 instead? Run the file through ffmpeg to convert it.
  • Tours that play through the embedded launcher on another site can't be recorded. Those are view-only on that site by design — record from your own Manuscript panel instead.
  • Browser-internal pages (chrome://, edge://) and the new-tab page can't be recorded — same browser rule that blocks the rest of Manuscript on those pages.
  • 탭 말고 창을 공유하세요. 브라우저가 무엇을 공유할지 물으면 창(Window)을 고르고 "시스템 오디오 공유"를 켜세요 — 음성 안내가 영상에 담기는 유일한 방법이에요. 탭 하나로는 페이지 소리가 담기지 않습니다.
  • WebM 동영상 파일. 요즘 플레이어는 대부분 잘 엽니다 — Chrome, Edge, VLC, Windows 11 기본 Media Player 모두 OK. 구형 Windows Media Player 는 Microsoft Store 의 무료 Web Media Extensions + VP9 Video Extensions 가 있으면 재생됩니다 (Windows Update 로 이미 깔려 있는 경우도 많아요). MP4 가 필요하면 ffmpeg 로 변환해서 쓰세요.
  • 다른 사이트에 임베드된 런처에서 재생되는 시연은 녹화할 수 없습니다. 그쪽은 보기 전용으로 설계돼 있어요 — 녹화는 본인의 Manuscript 패널에서 진행하세요.
  • 브라우저 자체 페이지(chrome://, edge://) 와 새 탭은 녹화 불가 — Manuscript 의 다른 기능과 동일한 브라우저 정책 때문입니다.

9. Check that steps still match the page

9. 스텝이 페이지와 여전히 맞는지 점검

Pages change over time — internal names get renamed, ids get regenerated, words get rewritten. Validation walks through every step you wrote and tells you, with one of four colors, whether Manuscript can still find the original spot. Open the modal, hit 검증 시작 (Start validation), and every step lights up green / yellow / red one by one. Tours that span multiple pages navigate themselves.

페이지는 시간이 지나면 바뀝니다 — 내부 이름이 바뀌고, 식별자가 새로 생성되고, 글자도 다듬어지죠. 검증은 작성한 모든 스텝을 하나씩 돌려보며, Manuscript 가 원래 자리를 아직 찾아낼 수 있는지 네 가지 색으로 알려줍니다. 모달을 열고 검증 시작 을 누르면 각 스텝이 녹/노/빨로 차례로 표시됩니다. 여러 페이지에 걸친 시연은 자동으로 페이지를 이동합니다.

How to run

실행 방법

  1. Click the icon in the panel footer.
  2. A modal opens with every step listed in order, waiting to be checked.
  3. Hit 검증 시작. Steps on the current page light up one by one as Manuscript finds each spot.
  4. If the scenario has steps on other pages, the modal shows a Moving to next page… banner, navigates there, and picks the modal back up automatically on the new page.
  5. After the last page the modal shows 검증 완료 (Validation complete) and the panel takes you back to the scenario's first page so you're back where you started.
  6. Esc or the × in the corner closes the modal at any time.
  1. 패널 하단의 아이콘을 클릭합니다.
  2. 모든 스텝이 순서대로 나열된, 아직 점검 전 상태의 모달이 열립니다.
  3. 검증 시작 을 누르면, 현재 페이지의 스텝들이 Manuscript 가 자리를 찾는 순서대로 색이 채워집니다.
  4. 다른 페이지에 있는 스텝이 있으면 다음 페이지로 이동 중… 배너가 뜨고 자동으로 이동, 이동한 페이지에서 점검이 자연스럽게 이어집니다.
  5. 마지막 페이지가 끝나면 검증 완료 상태가 되고, 패널이 시연 1번 페이지로 자동 복귀합니다.
  6. Esc 또는 모서리 × 로 언제든 모달을 닫을 수 있습니다.
Validation modal — Manuscript icon and wordmark at the top, title row, summary line with colored dots, then a list of every step in scenario order with status icons (green check, yellow warning, red cross, gray pending), and Start validation / Close buttons at the bottom. 검증 모달 — 상단 Manuscript 아이콘과 wordmark, 타이틀 행, 색상 dot 이 들어간 요약 줄, 시나리오 순서대로 나열된 스텝 행 (녹색 체크, 노랑 경고, 빨강 X, 회색 대기), 하단 검증 시작 / 닫기 버튼.
Validation modal — brand row, summary with colored dots, step rows in scenario order with per-row status, and Start / Close actions.
검증 모달 — 브랜드 행, 색상 dot 으로 표시된 요약, 시나리오 순서대로 나열된 스텝 행 + 상태 아이콘, 하단 검증 시작 / 닫기 버튼.

What the colors mean

색의 의미

  • Green — best shape. The page's internal name tag is still in place, and Manuscript found the spot the most reliable way.
  • Yellow — recovered another way. The original name tag is gone, but the visible text and what's around it still uniquely point to the spot. Re-pick the step when you have time.
  • Red — couldn't find it. The element doesn't exist on this page anymore (or even the location-based guess didn't recover it within 2 seconds). Use the row's 재픽 (Re-pick) action.
  • Gray — not checked yet. Either validation hasn't started, or this step is on a page that hasn't been visited in this run.
  • 녹색 — 가장 안정. 페이지의 내부 이름표가 그대로 있고, 가장 튼튼한 방법으로 자리를 찾았습니다.
  • 노랑 — 다른 방법으로 회복. 원래 이름표는 사라졌지만 보이는 글자와 주변 위치만으로도 그 자리를 유일하게 찾아냈습니다. 여유 있을 때 다시 픽 권장.
  • 빨강 — 찾지 못함. 요소가 이 페이지에 더 이상 없거나, 위치 기반 짐작으로도 2 초 안에 회복하지 못함. 행의 재픽 버튼 사용.
  • 회색 — 아직 확인 안 함. 검증이 시작되지 않았거나, 그 스텝의 페이지를 이 검증 회차에서 아직 방문하지 않은 상태.

Sub-elements get small dots too

서브 요소도 작은 dot

Each sub gets a smaller dot next to the step row, in the same color scheme. Click the row to expand the sub list and see which sub failed — fixing one sub doesn't require re-picking the whole step.

각 sub 는 스텝 행 옆에 작은 dot 으로 같은 색 체계로 표시됩니다. 행을 클릭해 sub 목록을 펴면 어느 sub 가 실패했는지 보입니다 — sub 하나 고치자고 스텝 전체를 재픽할 필요가 없어요.

Row actions

행 액션

  • 이 스텝 보기 (Show this step) — closes the modal and jumps to that step in the panel, scrolling the card into view. If you're already on the right page, no reload — it just focuses.
  • 재픽 (Re-pick) — closes the modal, opens that step, and arms the picker. The next click on the page replaces the original element. Sub-element re-picking is done through the sub track on the step card.
  • 이 스텝 보기 — 모달을 닫고 그 스텝을 패널에서 선택, 카드를 화면 안으로 스크롤합니다. 이미 같은 페이지면 새로고침 없이 focus 만 이동.
  • 재픽 — 모달을 닫고 그 스텝을 열어 picker 를 활성화합니다. 페이지에서 다음 클릭이 기존 요소를 교체합니다. 서브 요소 재픽은 카드의 서브 트랙에서 따로 처리합니다.

Colors reset when you close the panel

패널을 닫으면 색이 초기화돼요

Closing the panel clears the colored dots. The next time you open the panel everything starts blank — run validate again to see the colors. This is on purpose: dots left over from a long time ago would be misleading.

패널을 닫으면 색 표시(dot)가 모두 초기화됩니다. 다시 열면 빈 상태에서 시작하므로, 색을 보려면 검증을 다시 한 번 돌려야 합니다. 의도된 동작이에요 — 오래된 색이 그대로 남아 있으면 오히려 오해를 부를 수 있기 때문입니다.

How long Manuscript waits per element

요소 하나당 기다리는 시간

Each element gets up to 2 seconds to show up on the page. All the elements on the same page are checked at the same time, so a whole page takes at most one 2-second window — if validation is slow on a page with lots of steps, it's almost always a real problem and not the waiting time.

요소 하나당 페이지에 나타날 때까지 최대 2 초 기다립니다. 같은 페이지 안의 요소들은 동시에 함께 확인하므로, 한 페이지의 최대 대기 시간은 2 초입니다 — 스텝이 많은 페이지의 검증이 느리다면 거의 대기 시간 때문이 아니라 실제 문제일 가능성이 높습니다.

10. Export & import

10. 내보내기·불러오기

The export button in the panel footer downloads your whole manuscript as a single JSON file — every step, every annotation, every color and font the tour uses. Importing works from the popup (see just below); older files are automatically upgraded to the current version. Hand the JSON to a teammate by email or chat, or keep it alongside your project files so the manual stays in sync with what it explains.

패널 하단의 내보내기 버튼으로 시연 전체를 하나의 JSON 파일로 내려받습니다 — 모든 스텝·메모·색·글꼴이 한 파일 안에 들어 있어요. 불러오기는 팝업에서 합니다(바로 아래 참고). 예전 버전 파일은 현재 버전으로 자동 업그레이드돼요. JSON 파일을 메일이나 메신저로 동료에게 보내거나, 프로젝트 파일 옆에 같이 보관해 시연이 설명 대상과 함께 관리되도록 하세요.

Import from the popup

팝업에서 바로 가져오기

Received a JSON walkthrough from a colleague? Click the Manuscript icon to open the popup, then hit ↑ Open a JSON file right below the + New Manuscript button. The picked file is added to your Previous Manuscripts list, and the panel opens on the current tab with that scenario already loaded — one click, ready to replay or edit.

동료에게 JSON 시연 파일을 받았다면? Manuscript 아이콘을 눌러 팝업을 열고 + 새 매뉴스크립트 버튼 바로 아래의 ↑ JSON 파일 가져오기 를 누르세요. 선택한 파일이 이전 매뉴스크립트 목록에 추가되고, 현재 탭에 패널이 열리면서 그 시연이 바로 로드됩니다 — 한 번 클릭으로 재생·편집 준비 완료.

Extension popup with '+ New Manuscript' on top, '↑ Open a JSON file' button directly below it, and the Previous Manuscripts list under both. Extension 팝업 — 상단 '+ 새 매뉴스크립트', 그 아래 'JSON 파일 가져오기' 버튼, 그 아래 이전 매뉴스크립트 목록.
Popup import button — sits right under + New Manuscript. The picked file is added to your library and the panel opens with the scenario loaded.
팝업의 JSON 가져오기 버튼 — + 새 매뉴스크립트 바로 아래. 선택한 파일이 라이브러리에 추가되고 패널이 열리며 시나리오가 자동 로드됩니다.

File version compatibility

파일 버전 호환표

Each manuscript file is stamped with a version number. When you open an older file, Manuscript upgrades it on the fly to match the current version — the file on disk stays untouched until you save again. The table below shows which extension versions can read which file versions.

각 매뉴스크립트 파일에는 버전 번호가 함께 적혀 있습니다. 예전 파일을 열면 Manuscript 가 현재 버전에 맞게 자동으로 변환해 주고, 다시 저장하기 전까지는 디스크의 원본은 그대로 남아 있어요. 아래 표는 어떤 확장 버전이 어떤 파일 버전을 읽을 수 있는지 정리한 것입니다.

File version파일 버전 Written by저장한 버전 Readable by읽을 수 있는 버전 What changed변환 내용
0.1.0 v0.1.0 – v0.1.4 v0.1.0 – v0.1.4 All releases (auto-migrated) 전체 (자동 변환) 0.1.0 → 0.1.1 adds url, name, description, thumbnailDataUrl, waitForNavigation with safe defaults. 0.1.0 → 0.1.1 변환 시 url, name, description, thumbnailDataUrl, waitForNavigation 가 안전 기본값으로 추가됩니다.
0.1.1 v0.1.5 – v0.3.x v0.1.5 – v0.3.x v0.1.5 onwards v0.1.5 이상 0.1.1 → 0.1.2 is a version bump only; no field additions or removals on the migration boundary itself. 0.1.1 → 0.1.2 는 버전 번호만 올라가는 마이그레이션 — 필드 추가/삭제 없음.
0.1.2 (current)(현재) v0.4.0 onwards v0.4.0 이상 v0.4.0 onwards v0.4.0 이상 None — this is the current version. Older files automatically get a "no sub-elements" default. v0.4's validation colors are kept in memory only and are not saved into the file. 없음 — 현재 버전입니다. 이전 파일은 자동으로 "서브 요소 없음" 기본값을 받습니다. v0.4 의 검증 색 정보는 메모리에만 보관되고 파일에는 저장되지 않습니다.

Going forward: a future file version (like 0.2.0) won't open in older releases — if Manuscript meets a version it doesn't recognize, it refuses the import rather than quietly throwing away parts of the file. If you receive manuscripts from someone on a newer Manuscript, make sure your own extension is up to date.

앞으로의 호환성: 미래에 나올 파일 버전(예 0.2.0)은 그보다 옛 릴리스에서 열리지 않습니다 — 모르는 버전을 만나면, 파일의 일부 정보가 조용히 사라지는 대신 가져오기 자체를 거부합니다. 더 최신 Manuscript 로 만든 매뉴스크립트를 받는다면, 본인 확장도 함께 업데이트해 주세요.

11. Previous Manuscripts

11. 이전 매뉴스크립트

Clicking the extension icon a second time shows the Previous Manuscripts list — every manuscript you've authored. The most recent work is highlighted as Resume — one click puts you back where you left off, on the same page.

확장 아이콘을 다시 클릭하면 이전 매뉴스크립트 목록이 표시됩니다. 가장 최근 작업은 이어하기로 강조되며, 클릭 한 번으로 그 매뉴스크립트로 복귀합니다 (같은 페이지로 자동 이동).

Extension popup showing the Previous Manuscripts list — each row has a thumbnail, scenario name, last-edited timestamp; the topmost row is highlighted as 'Resume' with a primary-colored button. Extension 팝업의 이전 매뉴스크립트 목록 — 각 행에 thumbnail, 시나리오 이름, 마지막 편집 시각. 맨 위 행은 '이어하기' 강조.
Previous Manuscripts — most recent at the top, marked Resume. Click any row to reopen that scenario in the panel on its original page.
이전 매뉴스크립트 — 최근 작업이 맨 위, 이어하기로 강조. 어느 행을 클릭하든 그 시나리오를 원래 페이지에서 패널로 다시 엽니다.

Embed it on your own site

내 사이트에 끼워 넣기

Put a "Take the tour" button on your own page.

내 사이트에 '둘러보기' 버튼 달기.

Your visitors need the Manuscript extension installed. The bridge is a remote control rather than a player on its own. When a visitor doesn't have the extension yet, the bridge can either pop a small install prompt itself or hand the moment back to you via manuscript.openStore() / manuscript.openHomepage(). Both behaviors are opt-in — the bridge never injects UI you didn't ask for.
방문자에게 Manuscript 확장이 설치되어 있어야 합니다. 브리지는 사이트 안에서 시연을 실행하는 리모컨 역할이라, 확장이 없으면 (a) 브리지가 작은 설치 안내를 직접 띄워주거나 (b) manuscript.openStore() / manuscript.openHomepage() 로 그 순간을 직접 다룰 수 있어요. 두 방식 모두 옵션 — 호출하지 않은 UI 는 브리지가 알아서 띄우지 않습니다.

manuscript-bridge.0.1.3.js is a small, dependency-free file (about 14 KB) you drop onto your page. From there, your "Take the tour" button can load a saved tour and ask Manuscript to play it — the spotlights, notes, and narration take care of themselves. By default playback is read-only and cleans up after itself once the tour ends.

manuscript-bridge.0.1.3.js 는 의존성 없는 약 14 KB 짜리 작은 파일입니다. 내 페이지에 넣어두기만 하면, "둘러보기" 같은 버튼으로 저장해 둔 시연을 불러와 Manuscript 에 재생을 부탁할 수 있어요. 강조 표시·메모·음성 안내는 알아서 처리됩니다. 기본 재생은 보기 전용이며 시연이 끝나면 흔적 없이 깔끔하게 정리됩니다.

Option A — your own button

방법 A — 내 버튼 직접 만들기

Most common pattern. You author the button (any styling you want) and wire it to the bridge. When the extension is missing, send the visitor to the Web Store with openStore(); optionally to your own product page with openHomepage().

가장 자주 쓰는 패턴. 버튼은 직접 만들고(원하는 디자인 그대로) 브리지에 연결만 합니다. 확장이 없으면 openStore() 로 웹 스토어로 보내고, 옵션으로 openHomepage() 로 본인 제품 페이지로도 안내할 수 있어요.

<!-- in your page -->
<script src="/manuscript-bridge.0.1.3.js"></script>
<button id="start">Take the tour</button>

<script>
  // Opt in to the homepage fallback — without this, openHomepage() warns and no-ops.
  manuscript.configure({
    homepageUrl: 'https://zendy00.github.io/manuscript-pages/',
    banner: false,  // suppress the bridge's built-in install prompt — we handle it below
  });

  const btn = document.getElementById('start');

  btn.addEventListener('click', async () => {
    if (!(await manuscript.isInstalled())) {
      manuscript.openStore();         // or: manuscript.openHomepage()
      return;
    }
    btn.hidden = true;
    const scenario = await fetch('/tours/tour-en.json').then(r => r.json());
    await manuscript.load(scenario);
    await manuscript.play({ standalone: true });
  });

  manuscript.onExit(() => { btn.hidden = false; });
</script>
<!-- 호스트 페이지 안에 둡니다 -->
<script src="/manuscript-bridge.0.1.3.js"></script>
<button id="start">투어 시작</button>

<script>
  // 홈페이지 fallback 은 opt-in — 호출하지 않으면 openHomepage() 는 경고만 출력하고 no-op.
  manuscript.configure({
    homepageUrl: 'https://zendy00.github.io/manuscript-pages/',
    banner: false,  // 기본 설치 안내 끄기 — 아래에서 직접 처리
  });

  const btn = document.getElementById('start');

  btn.addEventListener('click', async () => {
    if (!(await manuscript.isInstalled())) {
      manuscript.openStore();         // 또는: manuscript.openHomepage()
      return;
    }
    btn.hidden = true;
    const scenario = await fetch('/tours/tour-ko.json').then(r => r.json());
    await manuscript.load(scenario);
    await manuscript.play({ standalone: true });
  });

  manuscript.onExit(() => { btn.hidden = false; });
</script>

Option B — let the bridge mount the launcher

방법 B — 브리지가 런처를 직접 띄우기

Zero-DOM-touch path. mountLauncher() attaches a Shadow-DOM-isolated pill to the bottom-right of your page. When the extension is installed it reads "Take the tour" and runs the configured scenario on click; when it's missing the same pill morphs into "Install Manuscript" (plus an optional "Learn more" link if you set homepageUrl). A small ✕ on the install prompt persists dismissal to localStorage.

DOM 안 건드리는 경로. mountLauncher() 가 Shadow DOM 격리된 pill 을 페이지 우하단에 띄웁니다. 확장이 설치돼 있으면 "투어 시작" 으로, 미설치면 같은 자리에 "Manuscript 설치" 가 뜨고 homepageUrl 을 지정해 두면 "자세히 보기" 링크도 함께 나옵니다. 안내의 ✕ 닫기 버튼은 localStorage 에 기억되어 같은 사이트에서 다시 뜨지 않아요.

<!-- in your page -->
<script src="/manuscript-bridge.0.1.3.js"></script>
<script>
  manuscript.configure({
    homepageUrl: 'https://zendy00.github.io/manuscript-pages/',  // optional "Learn more"
    lang: 'auto',           // 'auto' (default) / 'en' / 'ko'
  });

  manuscript.mountLauncher({
    scenarioUrl: '/tours/tour-en.json',  // or scenario: {...}
    label: 'Take the tour',             // optional override
  });
</script>
<!-- 호스트 페이지 안에 둡니다 -->
<script src="/manuscript-bridge.0.1.3.js"></script>
<script>
  manuscript.configure({
    homepageUrl: 'https://zendy00.github.io/manuscript-pages/',  // 옵션: "자세히 보기"
    lang: 'auto',           // 'auto'(기본) / 'en' / 'ko'
  });

  manuscript.mountLauncher({
    scenarioUrl: '/tours/tour-ko.json',  // 또는 scenario: {...}
    label: '투어 시작',                  // 옵션: 라벨 직접 지정
  });
</script>

Public API (manuscript.*)

공개 API (manuscript.*)

// ── Discovery
manuscript.isInstalled()                    // → Promise<boolean> (cached per page)
manuscript.refreshInstalled()               // re-ping, bust the cache

// ── Lifecycle
manuscript.load(scenario)                   // object or JSON string
manuscript.play({ startIndex, paused, standalone })
manuscript.pause() / manuscript.next() / manuscript.prev()
manuscript.jump(index)
manuscript.exit()

// ── Navigation (new in 0.1.3) — works with or without a launcher
manuscript.openStore()                      // opens the extension store in a new tab
manuscript.openHomepage()                   // opens configured homepageUrl, or warns + no-ops

// ── Auto-mounted launcher (new in 0.1.3)
manuscript.mountLauncher({ scenarioUrl, scenario, label, standalone })
manuscript.unmountLauncher()

// ── Configure
manuscript.configure({
  banner: true,                         // show install prompt on missing extension
  timeoutMs: 1500,
  lang: 'auto',                          // 'auto' | 'en' | 'ko'
  storeUrl: 'https://chromewebstore.google.com/...',
  homepageUrl: 'https://example.com',     // opt-in extra link
  onInstallClick: () => analytics.track('mn:install'),
  onHomeClick:    () => analytics.track('mn:learn-more'),
})

// ── Replay-end — fires on ✕ or natural end of tour
const off = manuscript.onExit(() => { /* restore your UI */ });
// off()  ← call to unregister
// or:    window.addEventListener('manuscript:exited', handler)
// ── 발견
manuscript.isInstalled()                    // → Promise<boolean> (페이지 내 캐시)
manuscript.refreshInstalled()               // 캐시 초기화 후 재핑

// ── 라이프사이클
manuscript.load(scenario)                   // 객체 또는 JSON 문자열
manuscript.play({ startIndex, paused, standalone })
manuscript.pause() / manuscript.next() / manuscript.prev()
manuscript.jump(index)
manuscript.exit()

// ── 이동 API (0.1.3 신규) — 런처 유무와 무관하게 호출 가능
manuscript.openStore()                      // 새 탭에서 확장 스토어 열기
manuscript.openHomepage()                   // homepageUrl 열기 (미설정 시 경고 + no-op)

// ── 자동 마운트 런처 (0.1.3 신규)
manuscript.mountLauncher({ scenarioUrl, scenario, label, standalone })
manuscript.unmountLauncher()

// ── 설정
manuscript.configure({
  banner: true,                         // 확장 미설치 시 설치 안내 자동 표시
  timeoutMs: 1500,
  lang: 'auto',                          // 'auto' | 'en' | 'ko'
  storeUrl: 'https://chromewebstore.google.com/...',
  homepageUrl: 'https://example.com',     // opt-in 추가 링크
  onInstallClick: () => analytics.track('mn:install'),
  onHomeClick:    () => analytics.track('mn:learn-more'),
})

// ── 재생 종료 — ✕ 클릭 또는 마지막 step 완료 시
const off = manuscript.onExit(() => { /* 사용자 UI 복원 */ });
// off()  ← 호출해서 등록 해제
// 또는:  window.addEventListener('manuscript:exited', handler)

Downloads

다운로드

manuscript-bridge.0.1.3.js (current)

The bridge library. openStore(), openHomepage(), mountLauncher(), and a Shadow-DOM-isolated install prompt. Drop it into your page and the manuscript.* global appears. The legacy manuscript-bridge.0.1.2.js URL stays live as an alias of this same file, so hosts pinned to it keep working unchanged.

브리지 라이브러리. openStore(), openHomepage(), mountLauncher() 와 Shadow DOM 격리된 설치 안내가 포함됩니다. 페이지에 추가하면 manuscript.* 전역이 노출됩니다. 구버전 manuscript-bridge.0.1.2.js URL 도 이 파일의 alias 로 그대로 살아 있어, 이 URL 에 고정해 둔 호스트는 무수정으로 계속 동작합니다.

↓ Download 0.1.3

SKILL.md

Hand this file to an AI agent (Claude, Cursor, …) along with a URL — the agent emits a ready-to-play tour JSON. No DOM picking, no manual JSON editing.

이 파일을 AI agent(Claude, Cursor 등)에 URL과 함께 전달하면 agent가 그대로 재생 가능한 투어 JSON을 출력합니다. DOM 직접 선택·JSON 수동 편집 불필요.

↓ Download

Tour JSON (example)

Example only — not a template for your site. The 8-step tour of this landing page. Selectors target elements that exist here (#features, #bridge, …) and will not match your own page. Use it as a reference shape, then have your AI agent author a fresh JSON for your URL via SKILL.md. English and Korean versions share the same selectors — only narration and step names differ.

예제일 뿐 — 본인 사이트 템플릿이 아닙니다. 랜딩 페이지를 8 스텝으로 안내하는 투어입니다. 셀렉터가 이 페이지의 요소(#features, #bridge 등)를 가리키므로 본인 페이지에서는 매칭되지 않습니다. 구조만 참고하고 본인 URL용 JSON은 SKILL.md로 AI agent에 새로 생성시키세요. 영어·한국어 버전은 셀렉터가 동일하며 narration과 step 이름만 다릅니다.

Good to know

알아두면 좋은 점

A couple of limitations to keep in mind.

알아두실 제한사항.

Capability항목 Status상태 Note비고
chrome:// / edge:// pageschrome:// · edge:// 페이지 Blocked불가 The browser's own settings pages don't allow any extension to run there.브라우저 자체 설정 페이지에는 어떤 확장 프로그램도 작동할 수 없어요.
Pages from other sites embedded inside the page다른 사이트가 들어 있는 프레임 Limited제한적 You can still pick something inside one — the click goes through. But during playback Manuscript can't reach back in to find that spot again, because the browser blocks one site from looking inside another site's frame. Embedded pages from the same site work fully.안에 있는 요소를 선택하는 것까지는 됩니다 — 클릭은 통과해요. 다만 재생 시점에는 Manuscript 가 그 자리를 다시 찾을 수 없습니다. 브라우저가 한 사이트에서 다른 사이트의 프레임 안을 들여다보지 못하도록 막기 때문이에요. 같은 사이트에서 들어온 프레임은 문제 없이 작동합니다.